Showing posts with label Airfix. Show all posts

Saturday, August 23, 2014

2011 Achievements


This year I kept better track of my builds and which theme(s) they were associated with. I also was able to achieve a few other goals for my hobby:
  • I started a blog of my Spitfire builds;
  • I participated in 2 Group Builds;
  • I completed 9 Spitfires/Seafires; my goal was 10 and I expected to get 8 back in October.
In order of construction, here they are:

Hobby Boss Spitfire Mk Vb, EP312 / D-K, personal mount of WC Dereck Kain, Edku, Egypt, 1944. Not a “bad” kit, but if you source the landing gear covers (mine came from a Revell Mk Vb), a new prop (Quickboost), and a new canopy (I used the kit one) it looks the part. Total cost is higher than it should be, given the aftermarket needed to make it acceptable. I’ll not do another. Dark Green, Dark Earth, Azure. Markings from spares and masks.
user posted image

Airfix Spitfire Mk IXc, 4th PS, 52nd FG, Corsica, January 1944, F/O Bob Hoover. I didn’t correct the kit like I should have as I didn’t realize the inaccuracies. This is a great kit to learn on, inexpensive and accurate in overall shape. Earth over Light Blue. Decals by Rising Decals (72-019).
user posted image

Airfix Spitfire Mk IIa, P7308/XR-D, 71 “Eagle” Squadron, P/O Bill Dunn, 27 August 1941. I finally got a new tooling Mk I here in the US and got the 3D-Kits Mk II conversion set at about the same time. I decided to make a IIa and try both out, since I liked the DFS in transition. Much has been said about the kit and conversion set, I’ve since purchased a half dozen more kits (the Mk I/II boxing) and the LR conversion from 3D-Kits. For the price this kit is an excellent basis for anything from an early Mk I to a Mk Va. Dark Green, Ocean Grey, Medium Sea Grey and Sky.
user posted image

Airfix Spitfire Mk IXc (early), MA585/KH-B, 403 Squadron RCAF, P/O George Beurling, 1943, (September Theme, “Canadian Bacon” and Spitfire Group Build online). My second attempt at the new tooling Mk IX, this time I corrected the kit by backdating the elevators, removed the wheel well bulges and sourced 5-spoke wheels. I also improved the cockpit with a better seat and column. Decals came from the Canadian IPMS sheet for RCAF aces. Dark Green, Ocean Grey, Medium Sea Grey & Sky.
user posted image

Airfix Spitfire Mk I, R6595, 610 Squadron, RAF, Biggin Hill, August 1940, (Airfix Group Build online). Another “old school” build, I decided to take my old 1979 tooling and make it a quick build like I would have back in 1979. Another subject chosen because of the history and with a unique scheme (too large unit markings and fin flash backwards). Hand painted Dark Green, Dark Earth and Sky; decals are from an Aeromaster Sheet on the BoB (72-028).
user posted image

CMR Spitfire Prototype K5054. I’ve quite a few of CMR’s Spitfires & Seafires to fill in my gaps. This is a lovely kit, it went together very quickly and I must say I’m getting much better at the vac canopy. Overall Light Grey-Blue (I used RLM 76).
user posted image

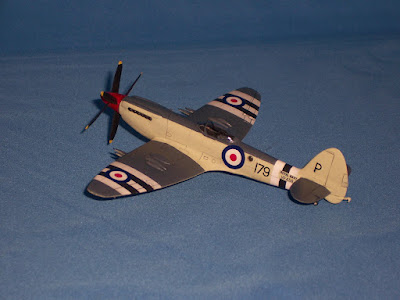
CMR Seafire FR.47, VP459, 179/P, 800 Squadron FAA, HMS Triumph, Fall 1950 (November Theme, “Land of the Morning Calm”). While I believe the Spitfire to be the most beautiful aircraft ever designed, the Seafire FR.47 is nearly my favorite of the line. In this livery it’s very attractive and the slim lines of the original Spitfire are taken to their limits. The only challenging portion of this build was the prop -- I wanted it to turn and may just replace it with a set that is permanently fixed. The vac canopy was no trouble at all.
user posted image

Airfix Spitfire Mk I (early), K9794, WZ T, 19 Squadron RAF, Duxford August 1938. Responding to another modeler who attempted to build their new tooling Spitfire and experienced an awful mess, I documented and shared my build as part of the same Airfix Group Build. I decided to complete it with spare decals from a CMR Mk I, as this was a scheme I wanted in my collection; albeit very close to the kit scheme.
user posted image

Fujimi Spitfire FR XIVe, 2 Squadron, 2nd TAF, RAF Wunsdorf, Germany, 1947. I began this build based on Paul Lucas’ excellent Camouflage & Markings, RAF Fighters 1945-1950 Overseas Based. Using period photos that appear to show a very dark scheme he surmised these were FR XIVe in the low-level recce scheme of Extra Dark Sea Grey, Extra Dark Sea Green over PRU Mauve. Alas, more recent research indicates that while authorized, no FR XIVe were painted thus, and all were delivered in a modified DFS of Dark Green, Ocean Grey over Medium Sea Grey with a Night spinner. A fairly easy build, I had to modify the tail wheel to be retractible and open the starboard camera port. My first use of the newer Tamiya paints for the DFS.
user posted image
Those last 3 will get their own postings soon in order to provide the usual details.  I failed to complete the MPM Spitfire FR Mk XVIII, but December was just too busy for me. 

I also got my other blog started, focused on all my models, not just Spitfires.

Thanks for looking.

Wednesday, August 20, 2014

Mk Va, R7347, USA Summer 1941


Spitfire Mk Va, R7347, assigned to USAAF for testing, Summer 1941

It seems there is always much to learn about the Spitfire.  When my interest in the Spitfire first began, I probably did what most modelers do:  I made a list.  The list started with Mk I, followed by II, III, IV, et cetera until I thought (wrongly at the time) that I had the full List of All Spitfire Marks that began with I in 1939 and ended with XVI in 1945.  I filled it in as I read about the different marks and where they were used.  Rarely did I see the II, never a III or IV nor a VI; an occasional VIII, lots of V and IX.  No X, XI or XIII.  No XV.  Oh joy, it’s really not a big list so it won’t take me long to make one of each just to see what they looked like, in the flesh (plastic) which was all I’d expect given how rare they are.

Then those darned suffix letters cropped up.  What could that be?  After nearly a year of reading and collecting books I realized it was the armament...sort of.  And the Mark number was basically tied to the engine...sort of.  Some other minor refinements came to play as well.  Suddenly my list grew.  And I hadn’t considered where the PR variants fell, nor those prefix letters.  That's a story for another day...

The Mk V came about as a response to the Me-109F.  Faster and higher flying than the Emil it was replacing, it outclassed the Mk I/II in frontline service with the RAF in 1940-41.  Like any good aircraft manufacturer, Supermarine was working with the RAF to develop a better Spitfire in the guise of the Mk III.  However so many improvements to the basic airframe as well as a new engine meant critical delays in production and one must remember that at the time, the RAF was licking its wounds from the BoB and facing Rommel in the desert.

So the obvious question was asked, “What if we stick the new Merlin on a Mk II airframe, and do it such that we don’t have to modify the airframe so much?”  The engine in the Mk III was the Merlin XX; which was needed for the Hurricane II so an uprated Merlin 45 that was based on the Merlin III was chosen.  It fit the cowling of the Mk I/II and just needed some slight mods that were easy and quick to implement.  The engine was “hotter” so needed a bit more cooling...the larger oil cooler from the Mk III would do.  A bit more torque so we’ll need to stiffen the fuselage...that’s a bit easy.  The Mk V was born and would be a short production run until the Mk III was ready.

History tells us the Mk III was cancelled and the Mk V the most produced single Mk of the Spitfire family (if one doesn’t combine the Mk IX and XVI production).  So much for an interim type.

The Aircraft
When Mk V production began, the cannon armed wing was still causing problems.  So initial production was the 8-gun Va. The intent all along was to make the Mk V a cannon armed variant. Some Mk V were conversions from earlier Mk I/II airframes.  Later in 1941 when the cannon armed “b” wing was fixed most surviving Mk Va aircraft were retrofitted to the Vb standard; as well as any Mk Ib/IIb that were still operational.  Some didn’t but those generally were no longer considered front line aircraft and were used for OTU duties.
R7347 was one of the last of a batch of Mk I’s ordered as Mk I’s but delivered as Mk Va.  Delivered in April 1941 to 39 Maintenance Unit, then transferred to the USAAF for testing at Wright Field later in April 1941, arriving in November 1941.  It remained there for testing until January 1943.  Unfortunately, I do not yet know the fate of R7347.

References: Spitfire the History, RAF Fighters 1945-1950 Overseas Based, Spitfire in Action

The Model
There are currently three alternatives for making a Mk Va:
  1. AZModel (limited run, limited availability but a very nice model)
  2. Airfix Mk I/IIa (contains the parts but no instructions)
  3. Bash together a Mk I/IIa with a Mk Vb to get a Mk I/IIb and a Mk Va (been there, done that, it didn’t work for me)
I have the AZModel kit but I’m reserving that for the usual Va subject, Douglas Bader’s W3185/DB that he was shot down in while over France in 1942.

The recent tooling by Airfix includes not only all the parts necessary to model the Mk I and Mk II, but the larger oil cooler for the Mk V as well as the proper De Havilland prop.  When first released in 2009 there was speculation that a Mk Va was soon to follow, but after 3 years still no Mk Va from Airfix.  So it was off to the spares box for decals.

It turns out the AZModel boxing has the decals for R7347 when tested in the US.  That certainly makes this all very easy. 

Construction is straightforward, but use part numbers 41 and 42 for the oil cooler, the round exhausts parts 21 and 22, and the DH prop.  Photos show the IFF aerials, so I drilled 0.1mm holes on each side, at about frame 17.5.  That is about 12 inches forward of frame 18, which is the extreme trailing edge of the wing/fuselage fairing.  I then measure up 9 inches from the horizontal stringer that aligns with the bottom of the cockpit door.  My method for installing these after all painting and decalling is done, is to superglue one end of the invisible thread into the elevator hinge line (underneath where you can't see them) and once cured run each into the holes.  Using tweezers I pull the IFF antenna taught through the cockpit opening and put a drop of glue to hold them.  I then put the canopy on. You won't see them on this model as I didn't put them on...frankly I forgot and the canopy is on, so there you have it.

Now, technically when on the ground the IFF aerials should be disconnected from the horizontal stabilizers so a ground mechanic or plane captain cannot accidently break it; but it looks "wrong" to me as a model when done correctly because it appears the antenna are broken off. 

Painting is standard Spitfire scheme for April 1941: Temperate Land Scheme of Dark Green (Humbrol Hu116), Dark Earth (Hu29) with Sky (Hu90) undersides, spinner and fuselage band.  I used acrylics throughout.  Night serial and no squadron codes.

Summary
An easy build, albeit I didn't do this one over a weekend, I could have had I wanted to.  I spent extra time on it and unfortunately the build got delayed by 3 months when I transferred due to a job change.


Thanks for looking...


Sunday, August 17, 2014

A Spitfire from Down Under


Spitfire Mk Vc Trop, BS219/ZP-X, 457 Squadron, RAAF, 1943, F/O Frank "Bush" Hamilton, Camden NSW


Until the Sword Vc arrived the only real option was to use the Airfix kit. Since the Revell Vb wing is poor on a good day, I decided to graft a spare Vc wing from an Airfix kit (using the kit to make a Vb) and the fuselage of the Revell kit. I could have done a much better job with it, and I hope to replace this particular subject someday. This was built back in 2010.

The Subject


BS219 was part of the first group of Spitfires sent to Australia. Bush Hamilton enlisted in the RAF in 1940, earned his wings in July 1941 and was posted back to Australia in May 1942. He and BS219 were joined together in November 1942 and remained together until June 1943 when he was listed as missing in action whilst flying another aircraft. He had 3 kills to his credit when he was lost. BS219 remained with 457 Squadron until November 1943.

The aircraft was probably delivered in Dark Earth, Middle Stone over Azure Blue as it was originally intended for operations in the Middle East. The desert scheme was not appropriate to Australia so the Middle Stone was overpainted with Foliage Green. Additionally, the red centers to the national markings were removed as well as the red from the fin flash. The fuselage band and spinner were probably RAAF Sky Blue, which is slightly different than RAF Sky Blue.

The Model


My first attempt at making a Vc turned out pretty good. With that one I married a spare CMR Seafire wing to a Revell Vb fuselage and I liked the result. This time around I chose to use a spare Airfix wing from a Vc kit. I don't think it came out very well, but that's because I chose not to thin the Airfix wing. To be fair, it fit well at the leading edge of the wing root and in my haste to do this subject I had glued the wing halves together before I realized the trailing edge was so thick.

Construction was very straight forward, really not any different than any other Spitfire kit. I did have to fiddle with the Vokes filter to make it all fit, but that came out pretty well.


For paint I used Humbrol 29 for Dark Earth, Aeromaster Medium Green (the USAAF color) for Foliage Green and an early recipe of Testors Azure Blue with 6 drops of Testors Red to make it just a bit more purple. The Sky Blue trim is the only acrylic, it was Pollyscale RAF Sky Blue.

It was sealed with Future (Kleer) before decals. The decals are from Aeromaster sheet 72-141 and went on perfectly using the Microscale system of Set first, then Sol. I sealed with a coat of Future with a drop of Testors clear Flat in the paint cup; this tones down the glossiness of the Future but leaves a smooth finish.

I was a bit heavy handed on the weathering, too much wash and "up close" it looks like I missed some areas. I also realized, too late, that the wing walk way stripe should be under the national marking, not over it.

Summary


This was an easy conversion, but as mentioned above, I could do better. I've got a Sword Vc in the works and it is much much nicer, both as a basic kit for building and the finesse of the details. I like the subject, but don't have those markings anymore; I've got similar markings so will probably use those on a future Vc from "down under".


Thanks for looking...


Tuesday, August 12, 2014

Seafire Ib, MB345/K, 885 Squadron


Seafire Ib, MB345/K, 885 Squadron, HMS Formidable, May 1943


This was my first Spitfire conversion, built way back in 2006 or 2007 (I'm not sure when).

The Subject


MB345 was originally delivered as a Mk Vb, serial AR445, and converted to Seafire Ib standard in 1942. In January 1943 it was assigned to 885 Squadron.

This is a well photographed aircraft, typically on the deck FORMIDABLE and during the Sicily and Italy campaigns of 1943. I chose this subject for a simple reason: it was dead easy!


The Model


Just like the real aircraft this model started out as the Airfix Vb. The tooling is showing its age, but shape wise is still very accurate. Modifications were easy: I used a resin Seafire hook conversion (forgotten who made it) and added the strengthening panels to the sides using think plastic card. All done with the conversion.


Decals were sourced from my spares, using standard 8 inch black numerals and cutting out a white K from decal film.  The decals were of course applied over Future (Kleer) and then sealed under another coat of Future.


Paints were enamels, I used Humbrol paints that were listed as Tropical Sea Scheme colors for Dark Slate Grey, Extra Dark Sea Grey and Sky. I won't list the colors because today I don't think they look right; at the time I had no idea what was righ or wrong for the TSS and when done this one didn't "look" right and still doesn't.


Summary


This was an easy conversion and I learned much about working with resin as this was also one of my first attempts at using resin extras other than simple wheels or props. I enjoyed the build and while it isn't as nice as the CMR kit (I have that one) it does fill a place on my shelf.

Thanks for looking...


Sunday, August 10, 2014

US Navy Spitfires


Spitfire LF Vb, 4Q, VCS-7, 6 June 1944


This is one of those impulse builds that resulted when I was searching the web for Spitfire info and came across a site that summarized the use of Spitfires by a US Navy squadron. I had to do it! I built this model back in 2009 as part of an anniversary build for D-Day.

The Subject


When the US battleships and cruisers got to the European theater for Operation Neptune (the actual landings part of Overlord) everyone quickly noticed the aircraft used for spotting were obsolete biplanes, SOC-3 Seagull floatplanes. These would be no match for any fighters the Luftwaffe would put up against them. So the squadrons traded in their biplanes (albeit temporarily) for Spitfires.


The Spitfires were older Vb aircraft, retrofitted with cropped superchargers and clipped wings as they were primarily used for low level work by this time of the war. Because of their age they were referred to as "clipped, cropped, and clapped out". The Naval Spotting Pool of Spitfires and Seafires was formed to provide spotting to the supporting battleships and cruisers during the landings. Both FAA and USN aircraft were used.

After about a month VCS-7 returned their Spitfires to the RAF; the land forces had moved far enough inland that sea bombardment no longer was effective. From what I can find on the internet (I know, not the best source of research!) there was only a couple of close encounters with the Luftwaffe, neither side actually shot down the other.

The Model


I decided to do this one as a quick build from an Airfix kit. I chose not to clip the wings as I found one photo that showed the wingtips in place, and at the time I wasn't keen on trying to clip wings. I also wanted to brush paint the entire model, instead of my typical air brushing. I did, however, airbrush the base color of Medium Sea Grey.

The paints are a mix of Humbrol and Testors enamels. Standard colors for Dark Green, Ocean Grey and Medium Sea Grey; any old black and white. I used a mask for the code letters so that they'd match the Sky band and spinner.

Decals were from the spares box. The serial number is not visible in the only photo of 4Q I've found, so I decided not to include it.


Summary


This was an easy build, and very enjoyable. It felt "old school" and the stripes are just rough enough to look quickly put on as they were on 5 June.

Thanks for looking...


Wednesday, February 12, 2014

PR XIX PS852


Spitfire PR Mk XIX, PS582, 81 Squadron, Kai Tek Hong Kong, 1951

When I received my new PR XIX I decided I did not want a typical PRU blue overall scheme as I already had a Spitfire PR XI in my collection with that scheme. It just so happened that XtraDecal released a PR XIX decal sheet that had many optional paint schemes so I purchased it.


The Subject


One of the schemes is PS852 which was in the high altitude scheme of PRU blue undersides, Medium Sea Grey uppersides and a black anti-glare panel on the nose. Very colorful with the bright post-war roundels.


I decided to look up PS852 to see why XtraDecal would include it on their sheet, other than it was colorful. The top hit on Google was http://www.spyflight.co.uk/spit.htm titled “Spitfires over China”.

In short, Flight Lieutenant Ed “Ted” Powles was detached from Tengah, Singapore as part of 81 (PR) Squadron with 2 PR XIX aircraft, PS852 and PS854, to Kai Tek, Hong Kong in January 1951. He and his flight spent the following year photographing sites along the Chinese coast and to a degree inland China as well. Two flights are of particular interest.

On 22 May 1951 he flew from Hong Kong to the southern end of Hainan Island to photograph the docks. Because he had to fly below a cloud deck he had to make 3 photo runs instead of the planned 2 and after evading pursuing Chinese fighters, he ran out of fuel on the return trip to Hong Kong.

Ultimately he was able to land, dead stick with the aircraft otherwise intact after 3 ½ hours of flight.

On 27 August 1951 he flew a similar mission to the northeast corner of Hainan Island to photograph the harbor, port and airfield at Haikou. Again he landed dead stick as his fuel ran out on final.

Ultimately Ted Powles flew 63 missions over China during 1951.

The Model


Airfix PR XIX, a new mold that is crisp, accurate and a very easy build. It’s also inexpensive at only $6 from Squadron. I built it straight OOB, the paint was Model Master enamels. PRU Blue and Medium Sea Grey. For both I air brushed them using Painters Oil Medium III(available at Michael’s) as my thinner. It allows a very smooth finish but takes about a week to fully cure. Very much worth it if time is not important. The black anti-glare panel is Tamiya acrylic, and the entire model was sealed after decaling with Future.


Summary


Much can be done with this kit if one wants to take care and add some detail.  Myself, I enjoy it for its ability to be a pallet.


Thanks for looking...


Sunday, January 12, 2014

Spitfire III Part 3


Over the holidays I able to make some progress on my long term project -- the Spitfire III N3297.  Readers may remember my previous posting wherein I summarized my knowledge, which hasn't changed much since.  I did decide since that N3297 was the bird I wanted to model, and her 1st configuration specifically.

So after studying my donor kit(s) carefully I decided to break out the saw and start cutting.


Since the Merlin XX added 4 inches to the engine cowling, but with no change from the firewall back, I essentially cut the nose cowling off the fuselage sides.  Done very carefully since I don't quite know I'll add that 4 inch plug.  Oh, and the firewall above mid-point of the fuselage cants forward -- that's got me a bit perplexed in terms of describing, but the first thing I have to do is get the nose extended properly.

I also have to shorten the wingspan.  With lots of study of both photos (not many) and my refs, the best I can surmise is the wingtips were removed at rib 19.  This is a full rib station further inboard than the later "standard" clipped wing.  It's easy to spot on the Airfix Mk I/II as it's the panel line that is inboard of the typical clipped line.  


Since the aileron was also shortened, I had to figure out to what length; ultimately I realized it was shortened to the hinge.  Note that later Mk VII/VIII and later Griffon marks had shortened ailerons, however the Spitfire III also had another few inches removed.  This will be easy as now that I've cut the tip off at the right place, I just have to fill the end and then sand to the contour.

So that is my next bit of work, time to sand and fill.

Thanks for looking…


Sunday, July 8, 2012

Airfix Spitfires


Airfix released 23 Spitfires in 4 scales over the last 57 years and their objective is to release one of each mark, in 72nd scale anyway. As the premier kitmaker foe Britain youd think their kits of their most iconic aircraft would be the best there is.   Unfortunately, some have been pretty horrible as either kits, Spitfires or both. Most are accurate, albeit detail is usually sparse (in the smaller scales anyway) and if one gets past the construction issues a fine Spitfire can be had. 
In two parts I'll cover all 23 to date, in this first part I'll cover the lone 100th & the 72nd scale kits. Next month I'll cover the 48th & their 24th scale kits.  Most of my information on dates and kit numbers are taken from The Airfix Tribute Forum. 
100th Scale
Okay, technically not Airfix, in 2007 they released under the Airfix label the Doyusha tooling of a Mark Vb as kit number T1002.  Considered “pretty good” they typically come pre-painted and sometimes are released with a motorized prop. 
72nd Scale
pastedGraphic.pdfAirfix began their aircraft models with a release of the BT-K in 1955. Based on the Aurora kit, it was scaled down to 72nd.  It is a very basic kit; its shape is definitely a Spitfire albeit not the most accurate; it is more for the beginner or nostalgic modeler. Only available until 1959 when it was replaced by their first Mark IX and is a collector's item today. The kit number was 1316, which is the same number for their Mark IX. 
Not to be confused with their first true Mark I, released in 1979 as kit number 01065, and re-released in 2003 in the BT-K bag. 
pastedGraphic_1.pdfIn 1959 Airfix released a Mark IX to replace the BT-K Spitfire. Also not very accurate it had markings for Wing Commander Johnnie E. Johnson's Mark IX. Originally kit number 1316, from 1988-2007 it was listed as 02081 and is generally available. Referred to as "the JEJ kit" it only looks like a Spitfire if it's the only one on the shelf. 
Airfix released a Mark Vb in 1975.  Still regarded as very accurate in shape and exterior detail. Of note, the raised detail is considered by purists to be the most accurate representation of the lapped joints along the panel lines. However Modelers in general prefer engraved panel lines, even if the most crisply done are actually over scale.  Still available as kit number 02046
pastedGraphic_2.pdfA Mark Vc was later released in 2005 by adding a sprue to the basic Vb kit representing the revised wing armament. The new kit number is 02040.  Unfortunately the wing is overly thick and suffers engraved panel lines not in keeping with the Vb kit. The good news is a tropical filter is provided as well as parts to modify the fuselage to a Seafire, which were added in 2009 for an Airfix Club FAA release. The decals are also quite good. It's apparent the Vc sprue is just a scaling down of their so-so 48th scale Spitfire/Seafire kit as it can also be made into a Vb, Vc or Seafire Ib, IIc or III; suffering from the same faults as the 72nd boxing.
pastedGraphic_3.pdfIf one can find an Aeroclub c wing, which is quite good and was specifically designed as a replacement part for this kit, a very accurate Vc, or Seafire IIc can be made. 
As mentioned earlier, in 1979 Airfix released a new Mark I, much better in shape than their earlier BT-K. This new kit was very similar in quality to their Vb kit.  The Mark I and their Vb were the basis for all aftermarket products to upgrade, convert or super detail an early Spitfire for the next 20 years. Originally listed as kit number 01065, renumbered a few times but mostly as a variation of 01071, don't be confused by the recent (2010) A01071A that is a new tooling.
pastedGraphic_4.pdfAfter Hornby bought Airfix they pledged to keep the label.  Eventually they released a new, modern tooling of the Mark I in a new red box. Very accurate in shape it also sported a highly detailed cockpit. It's only drawback is overly wide and deep panel lines; it seemed Hornby hired the Matchbox engraver!  This kit is available in both a starter's kit as well as the original and is considered more accurate even than Tamiya's Mark I. Kit number A01071A.  Also included in sets 55100, 50128, 50135, and 50143. 
A company called 3D-Kits shortly thereafter released a double sprue set containing an improved seat, control column, Coffman starter bulge and DH prop to allow conversion of either this new Mark I, the older Mark I or even the Tamiya Mark I to a Mark IIa. Also included were decals for 4 machines. 
In 2011 Airfix released this kit with an additional sprue containing parts to model an early Mark I (2 bladed Watts prop, flat canopy, pole antenna) as well as a Mark IIa (Coffman starter bulge and DH prop). Although no decals are in the box for it, the Rotol prop and enlarged oil cooler are on the sprue to allow the modeler to make a Mark Va. Unfortunate for 3D-Kits who now offer just the decals. Kit number A02010.
3D-Kits does offer a nice conversion for this kit to make the Mark IIa LR (long range). Just a simple conformal fuel tank for one wing, it includes decals. 
pastedGraphic_5.pdfIn 2009, Airfix released a Mark IXc to replace their 1959 tooling. Long needed in 72nd was an accurate kit and Airfix did not disappoint, however it was not as good, overall, as their recent Mark I. No cockpit to speak of, very similar to their toolings from the 1970's with a recliner for a seat and a plastic semicircle for the instrument panel, not even a decal!  Sporting similar deep panel lines, they weren't quite as bad as the Mark I. Parts were in the box to make an early or late Mark IXc and even a post-war mark, however only the wheels for a late Mark IXc were included (4 spokes). The prop is a bit anemic but is passable and the decals are very good.
pastedGraphic_6.pdfAlso in 2009 a PR Mark XIX variant was released, their first Griffon engined kit in 72nd scale.  Kit number 02017, it is very similar to the Mark IXc in detail, it does suffer from being too short by about 4 scale inches (it's the length of a late Merlin Spitfire, not a Griffon). Still a very nice kit to build, it's a toss up whether to improve this inexpensive kit or to pay top dollar for the difficult to find Fujimi XIX that also must be converted, albeit from a F Mark XIV. 
Not yet available in the US, Airfix announced a F Mark 22 for release for 2012, I'm still looking for a reboxing of their Mark I/IIa/Va as Wing Commander Douglas Bader's Va he was in when he was shot down and taken prisoner in 1941.

Tuesday, January 3, 2012

2012 Goals


Okay, 2011 was a very good year for me.  Nine Spitfires/Seafires completed!  I've got an ambitious 2012 planned as I've indicated over on my other blog; but only 5 Spitfires/Seafires are in the mix:
  • CMR Seafire XV
  • Airfix Spitfire Va (new tooling)
  • Airfix Spitfire II LR (new tooling)
  • Airfix Spitfire IXc (new tooling)
  • Sword Spitfire Vc
I've got a Sword Mk XVIe on the way, and I may put that in and take out the Airfix Mk IXc.  It all depends on my progress with the others, the Airfix kit is so easy/quick it's almost a weekend build.  Of course, I have that box of parts waiting for me to carve and glue a Spitfire Mk III from, but I still have quite a bit of information gathering to do on that one, like paint scheme and where exactly to cut the wings, for starters.

Thanks for looking...


Monday, November 28, 2011

Airfix Spitfire Mk Ia (1979 tooling)


Supermarine Spitfire I, R6595/DW O, 610 County of Chester Squadron, RAF
Biggin Hill, August 1940, P/O F. K. Webster, KIA 26 August 1940.

I was reviewing the Group Build section of Fine Scale Modeler last month and when I spotted an Airfix group decided I could be in and do a quick build of an older Mk Ia I had in my stash. My original plans for the kit were to convert it to a PR Mk I something or other that would not be a quick nor easy effort. So I rummaged through my spare decals and found an old Aeromaster sheet of Spitfires from the Battle of Britain (72-028). Paint and glue at the ready I jumped in.

The Aircraft

Spitfire Mk I, R6595, from first production batch of 450 aircraft on third contract awarded 9 August 1939.  This was the first aircraft in the batch, delivered 7 May 1940 to Number 8 Maintenance Unit. Delivered to 610 Squadron on 28 July 1940. Because of timing this aircraft would have been delivered to 8 MU with then then-required Night/White undersurfaces. While at the MU it would have been repainted with Sky undersurfaces per directives dating from June 11. This is certainly during the period from June to September where a controversial shade of Sky could have been applied, ranging from Sky Grey, Sky Blue, Eau-de-Nil, through to actual Sky.  As an example for demonstrating all the possible variations, this subject hits them all. Aeromaster suggest Sky.

This aircraft is featured in a fairly well known and widely published photograph from the period.  On Monday 26 August, 1940, the aircraft crashed after being badly damaged by a Bf109; the pilot, Pilot Officer F. K. Webster, was killed while attempting to land at Hawkinge.

References:  Spitfire the History, 610 Squadron History.

The Model

As mentioned above, this is the older tooling Airfix Spitfire Mk Ia dating from 1979.  Airfix modified the molds to be a snap together kit in the early 1980's.  Actually a fairly accurate kit in shape and outline, but the detail is raised (arguably more accurate) and the cockpit is nearly void except for a seat. The cockpit is not much of a problem if using the kit canopy as it is rather thick, most especially if one is to put a pilot in there. But if wanting to use a vac canopy much detail will be needed. For this effort I chose the kit canopy with no pilot.

As this was for the FSM Group Build I didn't want to take too long and it's the last of my old tooling Mk I kits. I removed the snap together pins to correct alignment but overall the fit is very good. As is typical of this kit and similar offerings from that period, construction was very quick and I was ready for painting within an hour. I almost felt like a kid again!

After a primer coat from a spray can, I hand painted the camouflage using Humbrol enamels.  Dark Earth (29) and Dark Green (116), after Sky (90) was airbrushed for the undersides.  Future was applied for the decals and followed with a light wash using Payne's Gray oil was applied.  A 50/50 mix of Future with Acryl clear flat was then applied as a final sealer.

Back to the undersurface color:  Humbrol 90 is listed as a recommended enamel paint for Sky, however the formulation has changed over the years. I have two tins, one the earlier Super Enamel before Hornby and Hornby's version with the blue stripe. The difference is subtle with the older paint looking truer to Sky with a slightly greener hue than the later paint.  Conversely the later paint is slightly bluer. I cannot stress how subtle the difference is and lighting conditions matter greatly. So based on the subject's timing, I used the later tin of "blue stripe" 90 as a local interpretation of sorts for Sky.

And that was that. A very fun build of a fairly familiar subject. It's unique with the oversized markings on the fuselage and fills a void in my collection of early Spitfires. Total time was less than 7 hours spread over a couple of weeks in order for paint and clear coats to thoroughly cure.

Monday, October 24, 2011

Airfix Spitfire Mk IXc


Supermarine Spitfire IXc, MA585/KH-B, 403 Squadron, RCAF
ALG Headcorn, September 1943, P/O George “Buzz” Beurling, DFC

The Aircraft


A Spitfire IXc, MA585 was an early production configuration having the original small carburetor intake, original elevator and 5 spoke wheels. Completed in June 1943 and delivered to 403 Squadron that month. MA585 remained with 403 Squadron until April when it was transferred to 501 Squadron; it survived the war and was sold to a foreign country


Pilot Officer Beurling was the leading Canadian ace of the war with 31 kills. Most were achieved over Malta in 1941/42 until he was shot down and injured. Following recovery he was posted to gunnery training which he disliked and eventually he was assigned to 403 Squadron. He was a lone wolf who did not follow orders and after reassignment to 412 Squadron in 1944 he was withdrawn from combat, grounded and sent home.

George Beurling volunteered to fly with the Isreali Air Force after the war and unfortunately while en route died in a plane crash near Rome.

Advanced Landing Ground (ALG) Headcorn was an airfield near (38 miles) London used as a prototype for the temporary landing areas that supporting fighters and fighter-bombers would use after D-Day France.

The Model

This Airfix Spitfire IXc is their new tooling from 2009. It's considered very accurate in shape and outline, however the cockpit detail leaves much to be desired and the recessed panel lines are a bit heavy for some tastes. The kit provides alternate parts to make (in theory) either an early or late IXc, however the wing and elevators are configured as a late IXc with wing bulges over the wheel wells (not introduced until late 1945 when wider wheels were introduced) and large elevator horn balances.

To improve the cockpit, I replaced the seat and added a control column, both from 3D-Kits. The wheels came from my spares box and the decals are from an IPMS Canada sheet for RCAF aces containing markings for many aircraft in all three major scales.

To model an early Mk IXc, the elevator outline needs to be rescribed and the wheel well bulges removed, either 4 (kit) or 5 spoke wheels (check photos), plus use the short carburetor intake.

To model a late wartime Mk IXc, remove the wheel well bulges, 4 spoke wheels (kit) and use the long carburetor intake.

To model a post-war Mk IXc with the wheel well bulges use 3 spoke wheels and use the long carburetor intake; unless your photo shows otherwise you'll also need to replace the rudder with a broad chord (pointed) unit. Quickboost make one for this kit.

Paints were all Humbrol (116, 106, 165, 90 and 24) except for the prop blades which was Mr Color 71 Midnight Blue (a near match for RAF Night).

Thanks for reading.