Saturday, August 23, 2014
Making a change...
After considering long and hard, I'm going to close this blog.
Don't get me wrong, I'm still going to build Spitfires, and blog about them. But instead of having a site dedicated to Spitfires, I've decided to have a single site for all of my modeling.
Over the next few days I'll set this site up to auto redirect to my other blog.
All of these posts will be moved over and eventually none of these will be here other than this post. The links should all be moved now.
Please accept my apologies if this creates an inconvenience, and hopefully you'll continue to come see what I've built!
Thanks for looking...
Low Level Recce - PR XIII
As I got a bit smarter about the Spitfire, I learned of the PR variants and the many coats of color they wore. Their missions were important, providing strategic as well as tactical reconnaissance of the theatre or battlefield, respectively.

Spitfire numbering can be confusing, especially the PR ones. Initially they were modified fighters, and their designations were references to the camera installations: PR IA, B, C, etc up to the PR IG. To reduce confusion the PR ID was renumbered PR IV, the PR IE was the PR VI, the PR IF the PR VII and the PR IG became the PR VIII. But those were also designations for fighters. Eventually in 1943 these were all replaced by either the high flying PR IV or tactical Recce PR XIII; albeit both were replaced by the PR XI or FR IX by mid 1944. By war's end these were being phased out by the Griffon PR XIX or FR XIV and FR XVIII. Whew!
Most PR or FR Spitfires wore unique camo schemes. All over Sky, Royal Blue, PRU Blue, Azure and White, Pink and some wore disruptive schemes similar to standard fighter types, but also quite unique. All because the PRU had a somewhat free hand to camouflage their aircraft as the tactical situation warranted.
The Subject
The PR XIII was a purpose built tactical (low level) reconnaissance aircraft, they were not intended to be conversions, albeit a few of the first ones were conversions from earlier PR IF and G machines. There eventually were only about 25 built. The design was based on the Mk V, optimized for low level operations with the Merlin 32 engine; some using the a wing and others the b, all had the inner armament removed and only retained the outer two .303 guns in each wing. The cannon bulges were removed, so all had the same appearance, externally (although I could be wrong on that point).
R7335, G3.K, was assigned to 718 Naval Air Squadron, FAA, NAS Henstridge in 1943. It carried a dark camouflage scheme, considered to most likely be the low level scheme of Extra Dark Sea Green and Extra Dark Sea Grey with PRU Mauve undersides. Given the low contrast of the upper surfaces, and that it was assigned to a NAS it could have been Dark Slate Grey instead of Extra Dark Sea Green, but since the under surface is dark I decided to paint it in the Low Level Scheme. It's also a very unique looking scheme on my shelf.

The Model
I started with the Airfix Mk I/IIa kit, their newest tooling. All the bits are there for a Mk Va, so the only mods I needed to make the PR XIII was to drill out the camera apertures, fill in the guns and a PR canopy. I used a 1/8th inch bit and used the PR XIX as a template. The apertures were then filled with white glue to keep paint on the outside, and not allow it to get inside the fuselage.

The next PR mod was to fill the inner two pair of gun panel lines. I used putty thinned with liquid glue; once dry I sanded it all lightly until smooth. Finally, I had to source a PR canopy with an armored windscreen.
I have the Falcon Spitfire set of vac canopies and found a pair of armored windscreens. After some trimming I checked the fit and the rear portion didn't quite work. So I trimmed it off and used the rear panels from the Airfix kit. The windscreen was still a bit off but by filling in with acrylic glue along the edges it looked right. The canopy didn't like the Humbrol acrylic paint, but after another coat of Future it started to take.
For paints I mixed Extra Dark Sea Grey using recipe of Hu123:50 + Hu34:6 + Hu25:3. Okay, I didn't count drops, but that equates to adding 1.5 ml of Hu34 and about 0.75 ml of Hu25 to a pot of Hu123 (older 12 ml pot). I used a digital color swatch from Nick Millman that was with other colors to eyeball the PRU Mauve, starting with a homemade recipe for PRU Pink (pot of Hu34 with 2 drops Hu60 and 4 drops Hu40); and adding PRU Blue (Hu230) in a ratio of 6 ml Pink to 2 ml blue to 0.5 ml Red (Hu60). All very easy if using standard pots; I just took half of the PRU Pink I'd mixed and transferred it to a mixing jar, then added 2 ml of PRU Blue and 0.5 ml of Hu60 Red. Finally, Extra Dark Sea Green is just Model Master European I Dark Green, FS 34092. It's a very close match to my RAF Museum color sample (exact, to my eye). All paints were acrylics.

The decals are from Model Alliance, sheet 72131. I had no difficulty with them, they went down beautifully on a coat of Future; I used Revell's decal softener.
Summary
This was a very easy conversion, although I took longer than I should because I wasn't looking forward to the canopy. I'm starting to wonder why I am reluctant to work with vac canopies, I'm always happy with the result. I also had difficulty finding a good Extra Dark Sea Green. Ultimately I waited until my wife could bring a bottle on one of her visits.
Thanks for looking...
Mk VIII, A58-464, CR-C, 80 Group, RAAF, 1944
Group Captain Clive R. Caldwell's personal aircraft

Always a subject I wanted on my shelf, G/C Caldwell is the leading RAAF ace with 27.5 victories (some sources say 28.5). When I decided to make 2013 a Spitfire year and July's challenge was a subject from "down under" necessity met opportunity.
The Subject
A58-464 is a Mk VIII delivered in the Desert Scheme of Dark Earth, Middlestone over Azure Blue. Upon receipt at 8 OTU in Australia it was repainted. In my search for the proper scheme I convinced myself that most in this batch of Mk VIII's were painted Foliage Green over RAAF Sky Blue. I've subsequently (after applying decals) discovered that possibly only the Middlestone was replaced by Foliage Green, making the scheme Dark Earth, Foliage Green over RAAF Sky Blue; so when I redo this scheme in the future, I'll get it right...whatever that scheme is.

This Mk VIII appears to be one of 3 (or 4) Mk VIII's with CRC codes flown by G/C Caldwell in 1944/1945.
The Model
I have a few of the older Hasegawa Mk VIII kits in the stash, but recently purchased the AZModel Mk VIII simply because it is supposed to be more accurate. It certainly is NOT as easy to build as Hasegawa, but I wanted to see if it really looks better.
The short answer: it does. The tail and nose looked balanced in length and overall it looks the part better than the Hasegawa kit...if sitting next to each other. If your Mk VIII's are all Hasegawa and don't sit next to more accurate late Merlin Spitfires, then it's a good choice, if you can find them.
Construction was straight forward with one exception: the wing tips. Why did AZModel choose to mold the wings with short span tips? It would certainly make a short span subject easier, but unfortunately I found the normal span tips to be thinner than the kit's wing, resulting in a step that required filling and sanding, losing a bunch of detail on the lower wing.
On the positive side, the canopy fit perfectly and all other construction was no harder than any other kit of a Spitfire.

I painted the kit using a mix of acrylics over Tamiya rattle can primer. The white trim is Humbrol, the Foliage Green is Model Master European I Green, and the RAAF Sky Blue is from Polly-Scale.
I used Master brass barrels for the guns, my first time trying them. At only about $6 per set, I think they are well worth it as they make a huge difference in appearance.
The decals are Propagteam, trimmed very close as the carrier covers the entire sheet. While the decals are thin, they readily broke apart, and are opaque resulting in a muted white with the green underneath showing through. The G/C badge was destroyed, I'll find a replacement eventually. I used some white to touch up the areas that tore, since most acrylic whites don't cover well, it actually turned out okay. The decals were expensive, but if you can find two sets cheap, douple them up and they'll look much better.
Summary
I'll do another one of these once I find some better decals. I will use the AZModel Mk VIII as the basis unless a better kit comes out, but I'll spend more time on those tips and hopefully not ruin as much detail.
Thanks for looking...
2011 Achievements
This year I kept better track of my builds and which theme(s) they were associated with. I also was able to achieve a few other goals for my hobby:
- I started a blog of my Spitfire builds;
- I participated in 2 Group Builds;
- I completed 9 Spitfires/Seafires; my goal was 10 and I expected to get 8 back in October.
Hobby Boss Spitfire Mk Vb, EP312 / D-K, personal mount of WC Dereck Kain, Edku, Egypt, 1944. Not a “bad” kit, but if you source the landing gear covers (mine came from a Revell Mk Vb), a new prop (Quickboost), and a new canopy (I used the kit one) it looks the part. Total cost is higher than it should be, given the aftermarket needed to make it acceptable. I’ll not do another. Dark Green, Dark Earth, Azure. Markings from spares and masks.

Airfix Spitfire Mk IXc, 4th PS, 52nd FG, Corsica, January 1944, F/O Bob Hoover. I didn’t correct the kit like I should have as I didn’t realize the inaccuracies. This is a great kit to learn on, inexpensive and accurate in overall shape. Earth over Light Blue. Decals by Rising Decals (72-019).

Airfix Spitfire Mk IIa, P7308/XR-D, 71 “Eagle” Squadron, P/O Bill Dunn, 27 August 1941. I finally got a new tooling Mk I here in the US and got the 3D-Kits Mk II conversion set at about the same time. I decided to make a IIa and try both out, since I liked the DFS in transition. Much has been said about the kit and conversion set, I’ve since purchased a half dozen more kits (the Mk I/II boxing) and the LR conversion from 3D-Kits. For the price this kit is an excellent basis for anything from an early Mk I to a Mk Va. Dark Green, Ocean Grey, Medium Sea Grey and Sky.

Airfix Spitfire Mk IXc (early), MA585/KH-B, 403 Squadron RCAF, P/O George Beurling, 1943, (September Theme, “Canadian Bacon” and Spitfire Group Build online). My second attempt at the new tooling Mk IX, this time I corrected the kit by backdating the elevators, removed the wheel well bulges and sourced 5-spoke wheels. I also improved the cockpit with a better seat and column. Decals came from the Canadian IPMS sheet for RCAF aces. Dark Green, Ocean Grey, Medium Sea Grey & Sky.

Airfix Spitfire Mk I, R6595, 610 Squadron, RAF, Biggin Hill, August 1940, (Airfix Group Build online). Another “old school” build, I decided to take my old 1979 tooling and make it a quick build like I would have back in 1979. Another subject chosen because of the history and with a unique scheme (too large unit markings and fin flash backwards). Hand painted Dark Green, Dark Earth and Sky; decals are from an Aeromaster Sheet on the BoB (72-028).

CMR Spitfire Prototype K5054. I’ve quite a few of CMR’s Spitfires & Seafires to fill in my gaps. This is a lovely kit, it went together very quickly and I must say I’m getting much better at the vac canopy. Overall Light Grey-Blue (I used RLM 76).

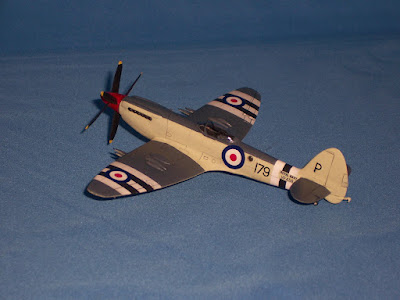
CMR Seafire FR.47, VP459, 179/P, 800 Squadron FAA, HMS Triumph, Fall 1950 (November Theme, “Land of the Morning Calm”). While I believe the Spitfire to be the most beautiful aircraft ever designed, the Seafire FR.47 is nearly my favorite of the line. In this livery it’s very attractive and the slim lines of the original Spitfire are taken to their limits. The only challenging portion of this build was the prop -- I wanted it to turn and may just replace it with a set that is permanently fixed. The vac canopy was no trouble at all.
Airfix Spitfire Mk I (early), K9794, WZ T, 19 Squadron RAF, Duxford August 1938. Responding to another modeler who attempted to build their new tooling Spitfire and experienced an awful mess, I documented and shared my build as part of the same Airfix Group Build. I decided to complete it with spare decals from a CMR Mk I, as this was a scheme I wanted in my collection; albeit very close to the kit scheme.

Fujimi Spitfire FR XIVe, 2 Squadron, 2nd TAF, RAF Wunsdorf, Germany, 1947. I began this build based on Paul Lucas’ excellent Camouflage & Markings, RAF Fighters 1945-1950 Overseas Based. Using period photos that appear to show a very dark scheme he surmised these were FR XIVe in the low-level recce scheme of Extra Dark Sea Grey, Extra Dark Sea Green over PRU Mauve. Alas, more recent research indicates that while authorized, no FR XIVe were painted thus, and all were delivered in a modified DFS of Dark Green, Ocean Grey over Medium Sea Grey with a Night spinner. A fairly easy build, I had to modify the tail wheel to be retractible and open the starboard camera port. My first use of the newer Tamiya paints for the DFS.

Those last 3 will get their own postings soon in order to provide the usual details. I failed to complete the MPM Spitfire FR Mk XVIII, but December was just too busy for me.
I also got my other blog started, focused on all my models, not just Spitfires.
Thanks for looking.
Wednesday, August 20, 2014
Mk Va, R7347, USA Summer 1941
Spitfire Mk Va, R7347, assigned to USAAF for testing, Summer 1941
It seems there is always much to learn about the Spitfire. When my interest in the Spitfire first began, I probably did what most modelers do: I made a list. The list started with Mk I, followed by II, III, IV, et cetera until I thought (wrongly at the time) that I had the full List of All Spitfire Marks that began with I in 1939 and ended with XVI in 1945. I filled it in as I read about the different marks and where they were used. Rarely did I see the II, never a III or IV nor a VI; an occasional VIII, lots of V and IX. No X, XI or XIII. No XV. Oh joy, it’s really not a big list so it won’t take me long to make one of each just to see what they looked like, in the flesh (plastic) which was all I’d expect given how rare they are.
Then those darned suffix letters cropped up. What could that be? After nearly a year of reading and collecting books I realized it was the armament...sort of. And the Mark number was basically tied to the engine...sort of. Some other minor refinements came to play as well. Suddenly my list grew. And I hadn’t considered where the PR variants fell, nor those prefix letters. That's a story for another day...
The Mk V came about as a response to the Me-109F. Faster and higher flying than the Emil it was replacing, it outclassed the Mk I/II in frontline service with the RAF in 1940-41. Like any good aircraft manufacturer, Supermarine was working with the RAF to develop a better Spitfire in the guise of the Mk III. However so many improvements to the basic airframe as well as a new engine meant critical delays in production and one must remember that at the time, the RAF was licking its wounds from the BoB and facing Rommel in the desert.
So the obvious question was asked, “What if we stick the new Merlin on a Mk II airframe, and do it such that we don’t have to modify the airframe so much?” The engine in the Mk III was the Merlin XX; which was needed for the Hurricane II so an uprated Merlin 45 that was based on the Merlin III was chosen. It fit the cowling of the Mk I/II and just needed some slight mods that were easy and quick to implement. The engine was “hotter” so needed a bit more cooling...the larger oil cooler from the Mk III would do. A bit more torque so we’ll need to stiffen the fuselage...that’s a bit easy. The Mk V was born and would be a short production run until the Mk III was ready.
History tells us the Mk III was cancelled and the Mk V the most produced single Mk of the Spitfire family (if one doesn’t combine the Mk IX and XVI production). So much for an interim type.
The Aircraft
When Mk V production began, the cannon armed wing was still causing problems. So initial production was the 8-gun Va. The intent all along was to make the Mk V a cannon armed variant. Some Mk V were conversions from earlier Mk I/II airframes. Later in 1941 when the cannon armed “b” wing was fixed most surviving Mk Va aircraft were retrofitted to the Vb standard; as well as any Mk Ib/IIb that were still operational. Some didn’t but those generally were no longer considered front line aircraft and were used for OTU duties.
 R7347 was one of the last of a batch of Mk I’s ordered as Mk I’s but delivered as Mk Va. Delivered in April 1941 to 39 Maintenance Unit, then transferred to the USAAF for testing at Wright Field later in April 1941, arriving in November 1941. It remained there for testing until January 1943. Unfortunately, I do not yet know the fate of R7347.
References: Spitfire the History, RAF Fighters 1945-1950 Overseas Based, Spitfire in Action
The Model
There are currently three alternatives for making a Mk Va:
 The recent tooling by Airfix includes not only all the parts necessary to model the Mk I and Mk II, but the larger oil cooler for the Mk V as well as the proper De Havilland prop. When first released in 2009 there was speculation that a Mk Va was soon to follow, but after 3 years still no Mk Va from Airfix. So it was off to the spares box for decals.
It turns out the AZModel boxing has the decals for R7347 when tested in the US. That certainly makes this all very easy.
Construction is straightforward, but use part numbers 41 and 42 for the oil cooler, the round exhausts parts 21 and 22, and the DH prop. Photos show the IFF aerials, so I drilled 0.1mm holes on each side, at about frame 17.5. That is about 12 inches forward of frame 18, which is the extreme trailing edge of the wing/fuselage fairing. I then measure up 9 inches from the horizontal stringer that aligns with the bottom of the cockpit door. My method for installing these after all painting and decalling is done, is to superglue one end of the invisible thread into the elevator hinge line (underneath where you can't see them) and once cured run each into the holes. Using tweezers I pull the IFF antenna taught through the cockpit opening and put a drop of glue to hold them. I then put the canopy on. You won't see them on this model as I didn't put them on...frankly I forgot and the canopy is on, so there you have it.
Now, technically when on the ground the IFF aerials should be disconnected from the horizontal stabilizers so a ground mechanic or plane captain cannot accidently break it; but it looks "wrong" to me as a model when done correctly because it appears the antenna are broken off.
 Painting is standard Spitfire scheme for April 1941: Temperate Land Scheme of Dark Green (Humbrol Hu116), Dark Earth (Hu29) with Sky (Hu90) undersides, spinner and fuselage band. I used acrylics throughout. Night serial and no squadron codes.
Summary
An easy build, albeit I didn't do this one over a weekend, I could have had I wanted to. I spent extra time on it and unfortunately the build got delayed by 3 months when I transferred due to a job change.

Thanks for looking...
It seems there is always much to learn about the Spitfire. When my interest in the Spitfire first began, I probably did what most modelers do: I made a list. The list started with Mk I, followed by II, III, IV, et cetera until I thought (wrongly at the time) that I had the full List of All Spitfire Marks that began with I in 1939 and ended with XVI in 1945. I filled it in as I read about the different marks and where they were used. Rarely did I see the II, never a III or IV nor a VI; an occasional VIII, lots of V and IX. No X, XI or XIII. No XV. Oh joy, it’s really not a big list so it won’t take me long to make one of each just to see what they looked like, in the flesh (plastic) which was all I’d expect given how rare they are.
Then those darned suffix letters cropped up. What could that be? After nearly a year of reading and collecting books I realized it was the armament...sort of. And the Mark number was basically tied to the engine...sort of. Some other minor refinements came to play as well. Suddenly my list grew. And I hadn’t considered where the PR variants fell, nor those prefix letters. That's a story for another day...
The Mk V came about as a response to the Me-109F. Faster and higher flying than the Emil it was replacing, it outclassed the Mk I/II in frontline service with the RAF in 1940-41. Like any good aircraft manufacturer, Supermarine was working with the RAF to develop a better Spitfire in the guise of the Mk III. However so many improvements to the basic airframe as well as a new engine meant critical delays in production and one must remember that at the time, the RAF was licking its wounds from the BoB and facing Rommel in the desert.
So the obvious question was asked, “What if we stick the new Merlin on a Mk II airframe, and do it such that we don’t have to modify the airframe so much?” The engine in the Mk III was the Merlin XX; which was needed for the Hurricane II so an uprated Merlin 45 that was based on the Merlin III was chosen. It fit the cowling of the Mk I/II and just needed some slight mods that were easy and quick to implement. The engine was “hotter” so needed a bit more cooling...the larger oil cooler from the Mk III would do. A bit more torque so we’ll need to stiffen the fuselage...that’s a bit easy. The Mk V was born and would be a short production run until the Mk III was ready.
History tells us the Mk III was cancelled and the Mk V the most produced single Mk of the Spitfire family (if one doesn’t combine the Mk IX and XVI production). So much for an interim type.
The Aircraft
When Mk V production began, the cannon armed wing was still causing problems. So initial production was the 8-gun Va. The intent all along was to make the Mk V a cannon armed variant. Some Mk V were conversions from earlier Mk I/II airframes. Later in 1941 when the cannon armed “b” wing was fixed most surviving Mk Va aircraft were retrofitted to the Vb standard; as well as any Mk Ib/IIb that were still operational. Some didn’t but those generally were no longer considered front line aircraft and were used for OTU duties.

References: Spitfire the History, RAF Fighters 1945-1950 Overseas Based, Spitfire in Action
The Model
There are currently three alternatives for making a Mk Va:
- AZModel (limited run, limited availability but a very nice model)
- Airfix Mk I/IIa (contains the parts but no instructions)
- Bash together a Mk I/IIa with a Mk Vb to get a Mk I/IIb and a Mk Va (been there, done that, it didn’t work for me)

It turns out the AZModel boxing has the decals for R7347 when tested in the US. That certainly makes this all very easy.
Construction is straightforward, but use part numbers 41 and 42 for the oil cooler, the round exhausts parts 21 and 22, and the DH prop. Photos show the IFF aerials, so I drilled 0.1mm holes on each side, at about frame 17.5. That is about 12 inches forward of frame 18, which is the extreme trailing edge of the wing/fuselage fairing. I then measure up 9 inches from the horizontal stringer that aligns with the bottom of the cockpit door. My method for installing these after all painting and decalling is done, is to superglue one end of the invisible thread into the elevator hinge line (underneath where you can't see them) and once cured run each into the holes. Using tweezers I pull the IFF antenna taught through the cockpit opening and put a drop of glue to hold them. I then put the canopy on. You won't see them on this model as I didn't put them on...frankly I forgot and the canopy is on, so there you have it.
Now, technically when on the ground the IFF aerials should be disconnected from the horizontal stabilizers so a ground mechanic or plane captain cannot accidently break it; but it looks "wrong" to me as a model when done correctly because it appears the antenna are broken off.

Summary
An easy build, albeit I didn't do this one over a weekend, I could have had I wanted to. I spent extra time on it and unfortunately the build got delayed by 3 months when I transferred due to a job change.

Thanks for looking...
Sunday, August 17, 2014
A Spitfire from Down Under
Spitfire Mk Vc Trop, BS219/ZP-X, 457 Squadron, RAAF, 1943, F/O Frank "Bush" Hamilton, Camden NSW

Until the Sword Vc arrived the only real option was to use the Airfix kit. Since the Revell Vb wing is poor on a good day, I decided to graft a spare Vc wing from an Airfix kit (using the kit to make a Vb) and the fuselage of the Revell kit. I could have done a much better job with it, and I hope to replace this particular subject someday. This was built back in 2010.
The Subject
BS219 was part of the first group of Spitfires sent to Australia. Bush Hamilton enlisted in the RAF in 1940, earned his wings in July 1941 and was posted back to Australia in May 1942. He and BS219 were joined together in November 1942 and remained together until June 1943 when he was listed as missing in action whilst flying another aircraft. He had 3 kills to his credit when he was lost. BS219 remained with 457 Squadron until November 1943.
The aircraft was probably delivered in Dark Earth, Middle Stone over Azure Blue as it was originally intended for operations in the Middle East. The desert scheme was not appropriate to Australia so the Middle Stone was overpainted with Foliage Green. Additionally, the red centers to the national markings were removed as well as the red from the fin flash. The fuselage band and spinner were probably RAAF Sky Blue, which is slightly different than RAF Sky Blue.
The Model
My first attempt at making a Vc turned out pretty good. With that one I married a spare CMR Seafire wing to a Revell Vb fuselage and I liked the result. This time around I chose to use a spare Airfix wing from a Vc kit. I don't think it came out very well, but that's because I chose not to thin the Airfix wing. To be fair, it fit well at the leading edge of the wing root and in my haste to do this subject I had glued the wing halves together before I realized the trailing edge was so thick.
Construction was very straight forward, really not any different than any other Spitfire kit. I did have to fiddle with the Vokes filter to make it all fit, but that came out pretty well.

For paint I used Humbrol 29 for Dark Earth, Aeromaster Medium Green (the USAAF color) for Foliage Green and an early recipe of Testors Azure Blue with 6 drops of Testors Red to make it just a bit more purple. The Sky Blue trim is the only acrylic, it was Pollyscale RAF Sky Blue.
It was sealed with Future (Kleer) before decals. The decals are from Aeromaster sheet 72-141 and went on perfectly using the Microscale system of Set first, then Sol. I sealed with a coat of Future with a drop of Testors clear Flat in the paint cup; this tones down the glossiness of the Future but leaves a smooth finish.
I was a bit heavy handed on the weathering, too much wash and "up close" it looks like I missed some areas. I also realized, too late, that the wing walk way stripe should be under the national marking, not over it.
Summary
This was an easy conversion, but as mentioned above, I could do better. I've got a Sword Vc in the works and it is much much nicer, both as a basic kit for building and the finesse of the details. I like the subject, but don't have those markings anymore; I've got similar markings so will probably use those on a future Vc from "down under".

Thanks for looking...
Tuesday, August 12, 2014
Seafire Ib, MB345/K, 885 Squadron
Seafire Ib, MB345/K, 885 Squadron, HMS Formidable, May 1943

This was my first Spitfire conversion, built way back in 2006 or 2007 (I'm not sure when).
The Subject
MB345 was originally delivered as a Mk Vb, serial AR445, and converted to Seafire Ib standard in 1942. In January 1943 it was assigned to 885 Squadron.
This is a well photographed aircraft, typically on the deck FORMIDABLE and during the Sicily and Italy campaigns of 1943. I chose this subject for a simple reason: it was dead easy!

The Model
Just like the real aircraft this model started out as the Airfix Vb. The tooling is showing its age, but shape wise is still very accurate. Modifications were easy: I used a resin Seafire hook conversion (forgotten who made it) and added the strengthening panels to the sides using think plastic card. All done with the conversion.

Decals were sourced from my spares, using standard 8 inch black numerals and cutting out a white K from decal film. The decals were of course applied over Future (Kleer) and then sealed under another coat of Future.

Paints were enamels, I used Humbrol paints that were listed as Tropical Sea Scheme colors for Dark Slate Grey, Extra Dark Sea Grey and Sky. I won't list the colors because today I don't think they look right; at the time I had no idea what was righ or wrong for the TSS and when done this one didn't "look" right and still doesn't.

Summary
This was an easy conversion and I learned much about working with resin as this was also one of my first attempts at using resin extras other than simple wheels or props. I enjoyed the build and while it isn't as nice as the CMR kit (I have that one) it does fill a place on my shelf.
Thanks for looking...
Sunday, August 10, 2014
US Navy Spitfires
Spitfire LF Vb, 4Q, VCS-7, 6 June 1944

This is one of those impulse builds that resulted when I was searching the web for Spitfire info and came across a site that summarized the use of Spitfires by a US Navy squadron. I had to do it! I built this model back in 2009 as part of an anniversary build for D-Day.
The Subject
When the US battleships and cruisers got to the European theater for Operation Neptune (the actual landings part of Overlord) everyone quickly noticed the aircraft used for spotting were obsolete biplanes, SOC-3 Seagull floatplanes. These would be no match for any fighters the Luftwaffe would put up against them. So the squadrons traded in their biplanes (albeit temporarily) for Spitfires.

The Spitfires were older Vb aircraft, retrofitted with cropped superchargers and clipped wings as they were primarily used for low level work by this time of the war. Because of their age they were referred to as "clipped, cropped, and clapped out". The Naval Spotting Pool of Spitfires and Seafires was formed to provide spotting to the supporting battleships and cruisers during the landings. Both FAA and USN aircraft were used.
After about a month VCS-7 returned their Spitfires to the RAF; the land forces had moved far enough inland that sea bombardment no longer was effective. From what I can find on the internet (I know, not the best source of research!) there was only a couple of close encounters with the Luftwaffe, neither side actually shot down the other.
The Model
I decided to do this one as a quick build from an Airfix kit. I chose not to clip the wings as I found one photo that showed the wingtips in place, and at the time I wasn't keen on trying to clip wings. I also wanted to brush paint the entire model, instead of my typical air brushing. I did, however, airbrush the base color of Medium Sea Grey.
The paints are a mix of Humbrol and Testors enamels. Standard colors for Dark Green, Ocean Grey and Medium Sea Grey; any old black and white. I used a mask for the code letters so that they'd match the Sky band and spinner.
Decals were from the spares box. The serial number is not visible in the only photo of 4Q I've found, so I decided not to include it.

Summary
This was an easy build, and very enjoyable. It felt "old school" and the stripes are just rough enough to look quickly put on as they were on 5 June.
Thanks for looking...
Sunday, June 29, 2014
Bob Hoover's Spitfire
Airfix Spitfire Mk IXc, WD-QQ, 4th FS, 52nd FG, Corsica, Italy, 1944. Flown by Bob Hoover.
Another build from the past. This is from Winter 2011, shortly after Airfix released their (then) new Mk IXc. I wanted to build it quickly simply because it was, at the time, the best and only Mk IX available. The Hasegawa kit has it's flaws and is typically quite expensive.

Since I had the Yankee Spitfires sheet by Rising Decals (sheet number RD 72-019) that I'd used for the Mk Vc, I waffled over the two Mk IX subjects. Ultimately I chose this one, simply because it was different AND it was flown by somebody I'd actually met/seen during one of his many air shows.
Since this was my first attempt at a Mk IX, and also my early forays into Spitfires in general, I didn't realize some of the details specific to an early Mk IXc. Things such as the wider cannon bay covers (the bulge over the wings) and the wheel well bulges. Both of these are characteristics of late Mk IX, and even postwar for the wheel well bulges. Ah well, a reason to build more...
Paints are acrylics. I used Pollyscale Sky Blue for the undersurfaces and either Tamiya Flat Earth or Pollyscale Italian light brown for the upper surfaces. I didn't document which it was. Since both colors are simply light brown and light blue, I felt like I had a bit of license. I'd like to do this one again, with the correct configurations to the kit and maybe I'll try different colors then.

Thanks for looking...
Sunday, February 16, 2014
PR XI PL776/Y
Supermarine Spitfire PR Mk XI, PL776/Y, 681 Squadron RAF, Alipore, India 1944/45

This is another of those early passionate builds of Spitfires. This time I wanted a PR bird but didn't want to make the typical PR XIX. This was my second attempt at a PRU Blue aircraft, the first being the Mosquito PR XVI, which languished for a few years, not due to the paint, but due to decals. Meanwhile I tackled this limited run kit by MPM way back in December 2008.
The Aircraft
The PR XI was basically a Mk VIII Merlin powered Spitfire, but with the unarmored wing of the PR IV, extra fuel tanks in the "wet" wings, and a non pressurized cockpit. The nose is deeper to accommodate a larger oil sump for longer flights. 790 were produced in 1943-44. The PR XI was the natural progression from the PR IV for a mass produced photo reconnaissance aircraft, replacing all of the earlier PR conversions and the PR IV from mid-1943. The PR XI was subsequently replaced by the PR XIX, the Griffon powered variant.

681 Squadron served in the South East Asia Command (SEAC) theater. Operating from Alipore airfield, India. The squadron was first formed from Number 3 PRU at Dum Dum, India in January 1943, initially equipped with the PR IV. The squadron re-equipped with the PR XI in October 1944 after they had moved to Alipore in May. They moved to Mingdalon in June 1945.
The squadron re-equipped a final time to the PR XIX in August 1945 and then moved to Kai Tak airfield, Hong Kong in September with the Japanese surrender.
PL776/Y was completed 23 February 1944 and delivered to 681 Squadron on 17 April 1944. She was used operationally until her engine cut and it made a belly landing near Whaiknyaung on 28 March 1945, she was struck off charge a month later.
The Model
This is a short run kit by MPM, kit number 72086. It has options for one USAAF and two RAF machines with either the early rudder or later broad-chord pointed rudder. It also contains some resin detail parts. After clean up it went together quite easily for a limited run kit. Frankly, cleaning up the parts was the most difficult part of the build.

Even the vac canopy was easy and I typically struggle with them.
The model was painted PRU Blue overall, using Model Master PRU Blue enamel. The white SEAC identification bars were painted, although they came on the decal sheet.

The decals came in the kit and went on very nicely with just Micro-Sol and Set.
Summary
Even 5 years later the model still looks like one of my better results. I didn't weather it at all as that was before my feeble attempts and botches, which is one reason I've gone back to no weathering; the models just look better.
Highly recommended as a first foray into limited run, if you can find the kit. I've seen them at shows for very little, as some folks are put off by MPM, especially the older kits.
Thanks for looking...
Wednesday, February 12, 2014
PR XIX PS852
Spitfire PR Mk XIX, PS582, 81 Squadron, Kai Tek Hong Kong, 1951
When I received my new PR XIX I decided I did not want a typical PRU blue overall scheme as I already had a Spitfire PR XI in my collection with that scheme. It just so happened that XtraDecal released a PR XIX decal sheet that had many optional paint schemes so I purchased it.

The Subject
One of the schemes is PS852 which was in the high altitude scheme of PRU blue undersides, Medium Sea Grey uppersides and a black anti-glare panel on the nose. Very colorful with the bright post-war roundels.

I decided to look up PS852 to see why XtraDecal would include it on their sheet, other than it was colorful. The top hit on Google was http://www.spyflight.co.uk/spit.htm titled “Spitfires over China”.
In short, Flight Lieutenant Ed “Ted” Powles was detached from Tengah, Singapore as part of 81 (PR) Squadron with 2 PR XIX aircraft, PS852 and PS854, to Kai Tek, Hong Kong in January 1951. He and his flight spent the following year photographing sites along the Chinese coast and to a degree inland China as well. Two flights are of particular interest.
On 22 May 1951 he flew from Hong Kong to the southern end of Hainan Island to photograph the docks. Because he had to fly below a cloud deck he had to make 3 photo runs instead of the planned 2 and after evading pursuing Chinese fighters, he ran out of fuel on the return trip to Hong Kong.
Ultimately he was able to land, dead stick with the aircraft otherwise intact after 3 ½ hours of flight.
On 27 August 1951 he flew a similar mission to the northeast corner of Hainan Island to photograph the harbor, port and airfield at Haikou. Again he landed dead stick as his fuel ran out on final.
Ultimately Ted Powles flew 63 missions over China during 1951.
The Model
Airfix PR XIX, a new mold that is crisp, accurate and a very easy build. It’s also inexpensive at only $6 from Squadron. I built it straight OOB, the paint was Model Master enamels. PRU Blue and Medium Sea Grey. For both I air brushed them using Painters Oil Medium III(available at Michael’s) as my thinner. It allows a very smooth finish but takes about a week to fully cure. Very much worth it if time is not important. The black anti-glare panel is Tamiya acrylic, and the entire model was sealed after decaling with Future.

Summary
Much can be done with this kit if one wants to take care and add some detail. Myself, I enjoy it for its ability to be a pallet.
Thanks for looking...
Saturday, February 8, 2014
F Mk XIVe RN119
Fujimi Spitfire F Mk XIVe, RN119/AE-J, 402 Squadron, RCAF, March 1945

I have a number of these Fujimi kits in their various guises. While they seem scarce as hen's teeth in shops and priced as such, they do become available at online auctions from time to time. I've got all I want of this kit, as I haven't identified enough subjects to drive me to want more. It doesn't help that as a building experience I'd rather not tackle such over-engineering. I originally built this model in June 2010.
The Aircraft

RN119 was assigned to 402 Squadron RCAF; the photo above is from the IWM, catalog number MH 6855, and is from March 1945. It later served with 412 Squadron RCAF and finally with the Belgian AF post war. One search indicates it was used to shoot down a Ju88 on 19 April.
Other than this photo ensures the modeler can build an accurate replica, I'm not sure of the significance of this subject. For myself, it was Canadian (I like having some Canadian subjects on the shelf for some reason) and it's a Spitfire.
The Model
My memory of this build has faded. I don't remember building it at all but know I must have as no one else builds models in my house and I don't accept built models from anyone. I do remember photographing it as it was done as part of a group of models while my basement was being remodeled and my photo booth was stored away.
At any rate, I do know it went together quite readily and at the time I had little references so the mods needed to make an accurate F Mk XIVe were not done. The ailerons are the wrong length (you have to fill the panel line to represent the shorter, Mk VIII style, ailerons) and there are some bumps that are in the wrong places or represent the PR Mk XIX. Also the cockpit just plain wrong for a Spitfire and if accuracy is important it must be replaced. Additionally, the tail wheel represents a modern modification; operationally they were retractable but modern war birds typically have them fixed down for both safety and maintenance reasons. I didn't make all the mods because at the time I didn't care.

I am sure this is the first of the Fujimi Spitfires I made and I was obviously impressed as I went out and acquired at least 5 more to represent the PR, F and FR variants, including one to be a FR XVIII (which I later realized was not right). Until AZ released their F Mk XIV kit, this Fujimi kit was the bee's knees as the other, Academy, kit is so wrong in shape; it's only redeeming value is a pretty good cockpit and some other details. Snap up the Academy kit at bargain prices and you can tart up any Spitfire.
It was painted using Model Master enamels as that is what I had at the time. I am sure I used the FS equivalents of the RAF Dark Green, Ocean Grey and Medium Sea Grey as it is what I had and I wasn't aware of the subtle differences in color back then. Of course now I'd be horrified to use FS equivalents on a Spitfire!
Obviously I used the kit decals. I do remember looking up the subject, JE-J/RN119, as I wanted to know its operational significance. One thing I dislike about Japanese kit makers is they typically provide no historical context for the subjects of their decals, just the squadron and sometimes the pilot's name. I truly loved reading historical context in the old Airfix instructions, it's what hooked me onto model airplanes way back when.
Summary
On the shelf it looks good. This must have been a quick build given I've no memory of it. I do have a few of those where I look on the shelf and wonder when I made it, only to note the copyright of the kit is within the last 20 years! I do have a plan for the other Fujimi kits, one of which is Ginger Lacey's mount while he was in Japan.
Thanks for looking...
Tuesday, February 4, 2014
Hasegawa Spitfire Ia
This is a kit I purchased back in the early '90's and started shortly after, but didn't finish until 2009.
When I started it I thought it was a good kit. Well, okay the definition of "good" meant "easy to build" and "bad" meant "impossible to build". At the time this was a good kit, to me. I had no idea it had inaccuracies and because it was so easy to build I purchased two more. My desire was to build a series of Mk I subjects that represented the different schemes worn from 1938 to 1941. This kit actually comes with decals for two variants of the Mk I, an early machine from 19th Squadron in May 1939 and Al Deere's mount during the Battle of Britain.

I built the kit out of the box, however the decals were the wrong size and out of register. I had some spare roundels and codes in Medium Sea Grey. I did use the Kiwi marking for All Deer's KL-B as it was the right size.

Overall I enjoyed the build, albeit the other 2 kits in my stash may just be donors to other kits. The wing/fuselage is completely wrong, having no gull-wing shape. This was the 2nd time I'd tried weathering and I way overdid it.

Some day I'll redo the subject, but will use the new-ish Airfix Mk Ia kit.
Thanks for looking...
Saturday, January 25, 2014
Heller LF XVI
Spitfire LF XVI, TB900/GE-D, 349 (Belgium) Squadron, Fassburg, 1946

This model was completed back in 2009 when my passion for Spitfires was just beginning to gain some steam. I had this Heller kit for a number of years; the instructions indicate HELLER HUMBROL.
The vintage of the kit is such that it has raised details. Until the more recent Sword XVI was released, this was the most accurate XVI in 72nd scale. Frankly, it still stands up well next to my more modern kits. It does suffer from the radiators being too deep. One modeler has suggested Heller was using photos of 349 Squadron when it flew both the XIV and XVI and made the mistake of presuming the key shots of the radiators were for the XVI.
At any rate, it's an error that is easily fixed with a razor saw. Simply cut the radiator off then reglue it. The thickness of the blade is generally enough to fix the problem. Unfortunately I wasn't aware of the problem with this kit when I built it, so did not know to fix it. I do remember that when building it I thought the radiators looked odd, but I had few (read zero) Spitfire references back then.

During construction I took care to retain the details. All was good and what little I lost along the fuselage seams was easily repaired with a hobby knife. I simply rocked it across the seam until a slight ridge of plastic came up. All sorted.
The Heller kit captures the shape very well. The shot along the fuselage axis quite nicely shows the nose could fit a Merlin. Some Spitfire kits are a bit anemic in that area.

The model is painted with Humbrol enamels. Ocean Grey is Hu106, Dark Green is Hu116 and Medium Sea Grey is Hu165. The model was coated with Future/Klear prior to decals.
Oh the decals! The kit decals are useless; even on this kit released today. The code letters are a sickly green, not Sky. The national markings are off register. I had found some Lifelike Decals, sheet 72-006, that had this scheme on it; since I wanted a Day Fighter Scheme for my first LF XVI, I decided to use these markings. I remember having absolutely no difficulty with them; I probably used Micro Set/Sol, which was my setting solutions at the time.

Overall I'm very happy with this model. It was an easy build over a few weekends and the kit looks the part. I like it so much I keep an eye out for them at shows. Typically they run $2-$3 each and are tremendous value for money at that price.
Thanks for looking…
Subscribe to:
Posts (Atom)