Showing posts with label Seafire. Show all posts

Saturday, August 23, 2014

2011 Achievements


This year I kept better track of my builds and which theme(s) they were associated with. I also was able to achieve a few other goals for my hobby:
  • I started a blog of my Spitfire builds;
  • I participated in 2 Group Builds;
  • I completed 9 Spitfires/Seafires; my goal was 10 and I expected to get 8 back in October.
In order of construction, here they are:

Hobby Boss Spitfire Mk Vb, EP312 / D-K, personal mount of WC Dereck Kain, Edku, Egypt, 1944. Not a “bad” kit, but if you source the landing gear covers (mine came from a Revell Mk Vb), a new prop (Quickboost), and a new canopy (I used the kit one) it looks the part. Total cost is higher than it should be, given the aftermarket needed to make it acceptable. I’ll not do another. Dark Green, Dark Earth, Azure. Markings from spares and masks.
user posted image

Airfix Spitfire Mk IXc, 4th PS, 52nd FG, Corsica, January 1944, F/O Bob Hoover. I didn’t correct the kit like I should have as I didn’t realize the inaccuracies. This is a great kit to learn on, inexpensive and accurate in overall shape. Earth over Light Blue. Decals by Rising Decals (72-019).
user posted image

Airfix Spitfire Mk IIa, P7308/XR-D, 71 “Eagle” Squadron, P/O Bill Dunn, 27 August 1941. I finally got a new tooling Mk I here in the US and got the 3D-Kits Mk II conversion set at about the same time. I decided to make a IIa and try both out, since I liked the DFS in transition. Much has been said about the kit and conversion set, I’ve since purchased a half dozen more kits (the Mk I/II boxing) and the LR conversion from 3D-Kits. For the price this kit is an excellent basis for anything from an early Mk I to a Mk Va. Dark Green, Ocean Grey, Medium Sea Grey and Sky.
user posted image

Airfix Spitfire Mk IXc (early), MA585/KH-B, 403 Squadron RCAF, P/O George Beurling, 1943, (September Theme, “Canadian Bacon” and Spitfire Group Build online). My second attempt at the new tooling Mk IX, this time I corrected the kit by backdating the elevators, removed the wheel well bulges and sourced 5-spoke wheels. I also improved the cockpit with a better seat and column. Decals came from the Canadian IPMS sheet for RCAF aces. Dark Green, Ocean Grey, Medium Sea Grey & Sky.
user posted image

Airfix Spitfire Mk I, R6595, 610 Squadron, RAF, Biggin Hill, August 1940, (Airfix Group Build online). Another “old school” build, I decided to take my old 1979 tooling and make it a quick build like I would have back in 1979. Another subject chosen because of the history and with a unique scheme (too large unit markings and fin flash backwards). Hand painted Dark Green, Dark Earth and Sky; decals are from an Aeromaster Sheet on the BoB (72-028).
user posted image

CMR Spitfire Prototype K5054. I’ve quite a few of CMR’s Spitfires & Seafires to fill in my gaps. This is a lovely kit, it went together very quickly and I must say I’m getting much better at the vac canopy. Overall Light Grey-Blue (I used RLM 76).
user posted image

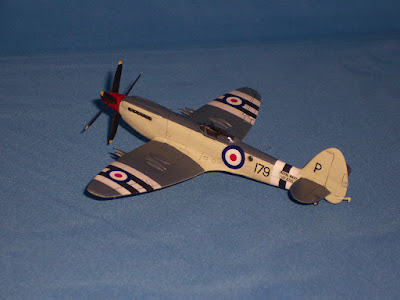
CMR Seafire FR.47, VP459, 179/P, 800 Squadron FAA, HMS Triumph, Fall 1950 (November Theme, “Land of the Morning Calm”). While I believe the Spitfire to be the most beautiful aircraft ever designed, the Seafire FR.47 is nearly my favorite of the line. In this livery it’s very attractive and the slim lines of the original Spitfire are taken to their limits. The only challenging portion of this build was the prop -- I wanted it to turn and may just replace it with a set that is permanently fixed. The vac canopy was no trouble at all.
user posted image

Airfix Spitfire Mk I (early), K9794, WZ T, 19 Squadron RAF, Duxford August 1938. Responding to another modeler who attempted to build their new tooling Spitfire and experienced an awful mess, I documented and shared my build as part of the same Airfix Group Build. I decided to complete it with spare decals from a CMR Mk I, as this was a scheme I wanted in my collection; albeit very close to the kit scheme.
user posted image

Fujimi Spitfire FR XIVe, 2 Squadron, 2nd TAF, RAF Wunsdorf, Germany, 1947. I began this build based on Paul Lucas’ excellent Camouflage & Markings, RAF Fighters 1945-1950 Overseas Based. Using period photos that appear to show a very dark scheme he surmised these were FR XIVe in the low-level recce scheme of Extra Dark Sea Grey, Extra Dark Sea Green over PRU Mauve. Alas, more recent research indicates that while authorized, no FR XIVe were painted thus, and all were delivered in a modified DFS of Dark Green, Ocean Grey over Medium Sea Grey with a Night spinner. A fairly easy build, I had to modify the tail wheel to be retractible and open the starboard camera port. My first use of the newer Tamiya paints for the DFS.
user posted image
Those last 3 will get their own postings soon in order to provide the usual details.  I failed to complete the MPM Spitfire FR Mk XVIII, but December was just too busy for me. 

I also got my other blog started, focused on all my models, not just Spitfires.

Thanks for looking.

Tuesday, August 12, 2014

Seafire Ib, MB345/K, 885 Squadron


Seafire Ib, MB345/K, 885 Squadron, HMS Formidable, May 1943


This was my first Spitfire conversion, built way back in 2006 or 2007 (I'm not sure when).

The Subject


MB345 was originally delivered as a Mk Vb, serial AR445, and converted to Seafire Ib standard in 1942. In January 1943 it was assigned to 885 Squadron.

This is a well photographed aircraft, typically on the deck FORMIDABLE and during the Sicily and Italy campaigns of 1943. I chose this subject for a simple reason: it was dead easy!


The Model


Just like the real aircraft this model started out as the Airfix Vb. The tooling is showing its age, but shape wise is still very accurate. Modifications were easy: I used a resin Seafire hook conversion (forgotten who made it) and added the strengthening panels to the sides using think plastic card. All done with the conversion.


Decals were sourced from my spares, using standard 8 inch black numerals and cutting out a white K from decal film.  The decals were of course applied over Future (Kleer) and then sealed under another coat of Future.


Paints were enamels, I used Humbrol paints that were listed as Tropical Sea Scheme colors for Dark Slate Grey, Extra Dark Sea Grey and Sky. I won't list the colors because today I don't think they look right; at the time I had no idea what was righ or wrong for the TSS and when done this one didn't "look" right and still doesn't.


Summary


This was an easy conversion and I learned much about working with resin as this was also one of my first attempts at using resin extras other than simple wheels or props. I enjoyed the build and while it isn't as nice as the CMR kit (I have that one) it does fill a place on my shelf.

Thanks for looking...


Sunday, July 8, 2012

Airfix Spitfires


Airfix released 23 Spitfires in 4 scales over the last 57 years and their objective is to release one of each mark, in 72nd scale anyway. As the premier kitmaker foe Britain youd think their kits of their most iconic aircraft would be the best there is.   Unfortunately, some have been pretty horrible as either kits, Spitfires or both. Most are accurate, albeit detail is usually sparse (in the smaller scales anyway) and if one gets past the construction issues a fine Spitfire can be had. 
In two parts I'll cover all 23 to date, in this first part I'll cover the lone 100th & the 72nd scale kits. Next month I'll cover the 48th & their 24th scale kits.  Most of my information on dates and kit numbers are taken from The Airfix Tribute Forum. 
100th Scale
Okay, technically not Airfix, in 2007 they released under the Airfix label the Doyusha tooling of a Mark Vb as kit number T1002.  Considered “pretty good” they typically come pre-painted and sometimes are released with a motorized prop. 
72nd Scale
pastedGraphic.pdfAirfix began their aircraft models with a release of the BT-K in 1955. Based on the Aurora kit, it was scaled down to 72nd.  It is a very basic kit; its shape is definitely a Spitfire albeit not the most accurate; it is more for the beginner or nostalgic modeler. Only available until 1959 when it was replaced by their first Mark IX and is a collector's item today. The kit number was 1316, which is the same number for their Mark IX. 
Not to be confused with their first true Mark I, released in 1979 as kit number 01065, and re-released in 2003 in the BT-K bag. 
pastedGraphic_1.pdfIn 1959 Airfix released a Mark IX to replace the BT-K Spitfire. Also not very accurate it had markings for Wing Commander Johnnie E. Johnson's Mark IX. Originally kit number 1316, from 1988-2007 it was listed as 02081 and is generally available. Referred to as "the JEJ kit" it only looks like a Spitfire if it's the only one on the shelf. 
Airfix released a Mark Vb in 1975.  Still regarded as very accurate in shape and exterior detail. Of note, the raised detail is considered by purists to be the most accurate representation of the lapped joints along the panel lines. However Modelers in general prefer engraved panel lines, even if the most crisply done are actually over scale.  Still available as kit number 02046. 
pastedGraphic_2.pdfA Mark Vc was later released in 2005 by adding a sprue to the basic Vb kit representing the revised wing armament. The new kit number is 02040.  Unfortunately the wing is overly thick and suffers engraved panel lines not in keeping with the Vb kit. The good news is a tropical filter is provided as well as parts to modify the fuselage to a Seafire, which were added in 2009 for an Airfix Club FAA release. The decals are also quite good. It's apparent the Vc sprue is just a scaling down of their so-so 48th scale Spitfire/Seafire kit as it can also be made into a Vb, Vc or Seafire Ib, IIc or III; suffering from the same faults as the 72nd boxing.
pastedGraphic_3.pdfIf one can find an Aeroclub c wing, which is quite good and was specifically designed as a replacement part for this kit, a very accurate Vc, or Seafire IIc can be made. 
As mentioned earlier, in 1979 Airfix released a new Mark I, much better in shape than their earlier BT-K. This new kit was very similar in quality to their Vb kit.  The Mark I and their Vb were the basis for all aftermarket products to upgrade, convert or super detail an early Spitfire for the next 20 years. Originally listed as kit number 01065, renumbered a few times but mostly as a variation of 01071, don't be confused by the recent (2010) A01071A that is a new tooling.
pastedGraphic_4.pdfAfter Hornby bought Airfix they pledged to keep the label.  Eventually they released a new, modern tooling of the Mark I in a new red box. Very accurate in shape it also sported a highly detailed cockpit. It's only drawback is overly wide and deep panel lines; it seemed Hornby hired the Matchbox engraver!  This kit is available in both a starter's kit as well as the original and is considered more accurate even than Tamiya's Mark I. Kit number A01071A.  Also included in sets 55100, 50128, 50135, and 50143. 
A company called 3D-Kits shortly thereafter released a double sprue set containing an improved seat, control column, Coffman starter bulge and DH prop to allow conversion of either this new Mark I, the older Mark I or even the Tamiya Mark I to a Mark IIa. Also included were decals for 4 machines. 
In 2011 Airfix released this kit with an additional sprue containing parts to model an early Mark I (2 bladed Watts prop, flat canopy, pole antenna) as well as a Mark IIa (Coffman starter bulge and DH prop). Although no decals are in the box for it, the Rotol prop and enlarged oil cooler are on the sprue to allow the modeler to make a Mark Va. Unfortunate for 3D-Kits who now offer just the decals. Kit number A02010.
3D-Kits does offer a nice conversion for this kit to make the Mark IIa LR (long range). Just a simple conformal fuel tank for one wing, it includes decals. 
pastedGraphic_5.pdfIn 2009, Airfix released a Mark IXc to replace their 1959 tooling. Long needed in 72nd was an accurate kit and Airfix did not disappoint, however it was not as good, overall, as their recent Mark I. No cockpit to speak of, very similar to their toolings from the 1970's with a recliner for a seat and a plastic semicircle for the instrument panel, not even a decal!  Sporting similar deep panel lines, they weren't quite as bad as the Mark I. Parts were in the box to make an early or late Mark IXc and even a post-war mark, however only the wheels for a late Mark IXc were included (4 spokes). The prop is a bit anemic but is passable and the decals are very good.
pastedGraphic_6.pdfAlso in 2009 a PR Mark XIX variant was released, their first Griffon engined kit in 72nd scale.  Kit number 02017, it is very similar to the Mark IXc in detail, it does suffer from being too short by about 4 scale inches (it's the length of a late Merlin Spitfire, not a Griffon). Still a very nice kit to build, it's a toss up whether to improve this inexpensive kit or to pay top dollar for the difficult to find Fujimi XIX that also must be converted, albeit from a F Mark XIV. 
Not yet available in the US, Airfix announced a F Mark 22 for release for 2012, I'm still looking for a reboxing of their Mark I/IIa/Va as Wing Commander Douglas Bader's Va he was in when he was shot down and taken prisoner in 1941.

Tuesday, January 17, 2012

“Land of the Morning Calm”


CMR Seafire FR.47
Vickers-Supermarine Seafire FR.47, VP459, 179/P, 800 Squadron, HMS Triumph, 1950
Introduction
I’d longed for a Seafire FR.47 for years; I was tempted to get the old vacform by Rareplanes but kept putting it off.  Mainly due to cost as it was a rare kit to find but also because the other Rareplanes kit I’d built back in the early ‘90’s didn’t come out too well; which somewhat scared me off vacs for a while (but that's another story as they say).  I was not aware of the Ventura kit from down under until recently, when Jays began re-releasing them.  
So when CMR released their resin kit I was very interested.  While the price was steep, I was willing to buy, but had no experience with resin kits.  So, off I went to find a low cost CMR on sale somewhere to gain some experience.  I found them at WestCoastHobbys, lower cost than eBay and much lower than the US distributer.  After a few builds were behind me I purchased the FR.47 and this year decided it was time to actually make it.  I had some good stock of accurate paints and the kit came with the exact scheme I wanted.  Plus, my local club decided to acknowledge the 60th anniversary of the Korean War with a theme for November, "Land of the Morning Calm".
The Aircraft
When the North Koreans invaded the South HMS Triumph was operating in the western Pacific. Her, along with some US carriers were quickly dispatched to Korean waters to provide air support to the UN forces retreating down the peninsula. 

800 Squadron was onboard with the last embarked Seafire squadron and provided escort to her Firefly strike aircraft as well as providing some light strike capability as required. Additionally she received tasking to escort B-29s as they bombed targets in the north.

It was on one of these early B-29 escort missions that B-29 gunners fired on their escorts – they looked too much like the attacking Yak-9’s – that the FAA began applying Night/White identification stripes to the wings and empennage. 

By late Fall, 1950, the air wing was tired and needed relieving. HMS Triumph returned to England where 800 Squadron proceeded to trade in her Seafires for another Supermarine product, the Attacker.
Reference:  Spitfire the History, Squadron in Action, Warpaint Series No. 20, On Target Profiles 5

The Model
CMR make just about every Mark of the Spitfire and Seafire in 72nd scale, from the prototypes (both variations of K5054) through to both the Spiteful and Seafang. If one wants a very accurate model of their subject, CMR can provide it; however the buyer must know that accuracy comes with a price. CMR kits are expensive but in my opinion are well worth it. The detail is exceptional and even my feeble attempts are made to look that much better.

After cleaning up the resin by removing the parts from the pour-stubs and washing them with liquid hand soap I was ready to paint.  Generally I use an airbrush and shot everything with interior grey-green (albeit I use Tamiya XF-21 Sky as it looks more "scale") and then painted the night/black areas with Mr Color Midnight Blue.  I feel this color has that bluish tinge to it that Night should have, plus it is more of a dark gray color, so I use it for props and other areas calling for Night.

I bent all the PE for the cockpit into the right shapes, really a simple affair and it came out so well I almost went against my own policy of never opening up the cockpit.  I drilled out the prop shaft location at the nose to ensure my contra-props would spin, more on that later...

The fuselage went together very easily, requiring almost no filler.  One reason I like these resin kits is that I can use a strong solvent like acetone to smooth seams after filling and it doesn't affect the resin or detail.  The wing was test fitted and as I've found with CMR kits don't glue the lower fuselage seam until the wing is on because it may need some sanding or fitting of a spacer to make it fit just right.  This kit was no different as the forward fuselage between the leading edge of the wing and the nose didn't quite fit properly.  If I closed up the seam then there was a wide gap at the wing roots forward; if I eliminated the wing root gaps there was a gap under the nose.

So after studying drawings and photos it was obvious the wing roots should have no gaps and the nose should have not gap either; meaning a slight V-shaped gap existed with the pointy end of the "V" was forward.  After getting everything aligned I ran some super glue and made it all permanent.  Then filled in the "V" with plasticard and filler.

To allow my props to be removed and also to spin (young hands always want to spin the prop!) I always glue a sheet of plastic about an inch from the nose inside the fuselage.  As mentioned earlier I also drill out the prop shaft location and before I put the wings on I glue a tube that can take a rod, usually a 16th inch rod into a 8th inch tube with a 16th inch inner diameter (of course).  Unfortunately the contra-prop meant I needed another tube with an 8th inch inner diameter.  Unfortunately I had nothing with a small enough outer diameter to fit inside the Seafire's nose, so off to the hardware store.  Eventually I found a brass sleeve for something or other related to plumbing that was perfect.

The CMR kit comes with a choice of either individual blades for the spinners or fully build up props/spinners.  I'm not real good at prop alignment so I decided to use the ones CMR build up for me.  After cleaning the flash off they look okay, but could be better.  I may build those spares up someday and swap them out; easy enough since I make my props removable and able to spin!  


After priming and minor cleanup of imperfections I shot the entire model with Humbrol 90. This is actually an older tin of Super Enamel that is a very good match to Sky. Newer tins produced by Hornby are not quite the same color, unfortunately. So I use my Humbrol 90 sparingly...

I then masked off the areas for the stripes, shot the white and then removed all the tape to let the paint cure for a week. Next weekend I masked the stripes and lower surfaces and with a mix I found on the internet for Tamiya paints, I shot the Extra Dark Sea Grey (EDSG). That mix, by the way, is: "to 50 parts of XF24 dark gray, add 6 parts XF2 white and 3 parts XF8 flat blue." It looks right to my eye, not having that greenish tinge some paint makers insist is EDSG or the very dark gray that is near to a version of Night.

After all the paint had cured well, a good week, I decided to use a technique a member of my club swears by: spit. Okay, what that really means is an old cotton t-shirt rubbed on the surface with some spit to moisten it. There's just enough friction to buff the paint up to a nice satin finish without affecting the detail or wearing through the paint. It was smooth enough not to require any Future/Klear as an undercoat to the decals!

The kit decals were very thin and went on with Micro-Set (blue label) followed by a quick dash of Micro-Sol (red label) after they'd dried to ensure they settled completely down into the recessed panel lines. Remaining details were put on and the final piece remained: THE VAC CANOPY. My nemesis...

I tackled the canopy by trimming it down to what appeared to be the canopy frame outer mold line. First using very coarse sanding sticks and progressing down to fine until I was taking almost nothing off with each swipe. I then tried a dry fit and to my disbelief it fit the first time! Perfect. Painted the framing with Night, used a wooden pick to clean the edges, then painted the EDSG. Dipped it in Future/Klear to make the clear canopy really pop. On it went with Gator Grip -- I love this stuff as it dries quick and clear. A quick drill for the whip antennae, which is just a short piece of invisible thread, and she was done.

All-in-all about 30 hours of modeling spread over 3 months. I'm pleased and it enjoys a place of honor, at the front and at eye level.

Thanks for looking...

Tuesday, January 3, 2012

2012 Goals


Okay, 2011 was a very good year for me.  Nine Spitfires/Seafires completed!  I've got an ambitious 2012 planned as I've indicated over on my other blog; but only 5 Spitfires/Seafires are in the mix:
  • CMR Seafire XV
  • Airfix Spitfire Va (new tooling)
  • Airfix Spitfire II LR (new tooling)
  • Airfix Spitfire IXc (new tooling)
  • Sword Spitfire Vc
I've got a Sword Mk XVIe on the way, and I may put that in and take out the Airfix Mk IXc.  It all depends on my progress with the others, the Airfix kit is so easy/quick it's almost a weekend build.  Of course, I have that box of parts waiting for me to carve and glue a Spitfire Mk III from, but I still have quite a bit of information gathering to do on that one, like paint scheme and where exactly to cut the wings, for starters.

Thanks for looking...