Sunday, January 5, 2014

SpitHawk


Hawk T.1 XX184/19 of 19 Squadron, 2008
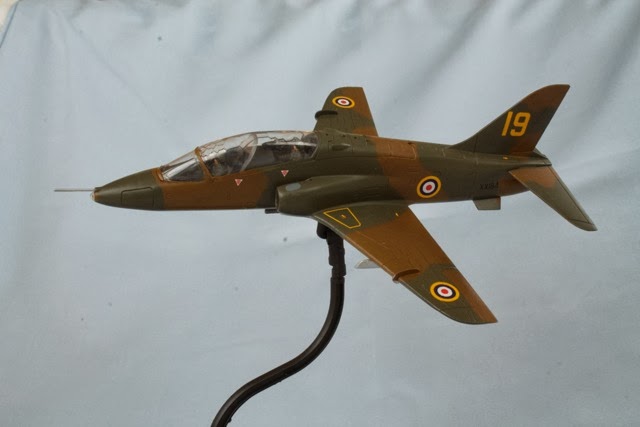
I struggled with where to blog this one: on my Spitfire blog or my general modeling blog? Obviously I chose this one because it's aligned to Spitfires.

This is my response to our club theme of "Build the same kit". 2013 was a year where I was able to align a Spitfire to each of the monthly themes for the year, if one presumes the SpitHawk counts!


The Subject

Google "SpitHawk" and you'll find lots of info on this aircraft. Essentially 19 Squadron, now a training unit for the RAF, was authorized to repaint XX184 in a commemorative scheme in 2008 to recognize the 70th Anniversary of the first operational Spitfire squadron -- 19 Squadron. My own commemoration of that event, this year being the 75th Anniversary, is here.

There is a photo of XX184 flying in formation with a Spitfire IIa P7350/XT-L that is in BoB markings. To mimic that photo I chose to put both my Spitfire I K9797 and Spithawk XX184 on a double in-flight stand. The effect is precisely what I wanted.

The Model

Construction was strictly out of the box. The kit provides an in-flight option, so with some care I was able to close up the landing gear. There is no attachment point provided for the Airfix stands (those double holes usually flashed over on their other modern kits) so I looked at what should be the balance point and drilled two holes in the under-fuselage gun pod. I then filled the pod with some white glue to let it harden and redrilled so the pins of the stand would have something to "grab".

The intakes took some work as photos show it to be a smooth surface yet the kit had ugly seams and some other "panels" that all needed filling. Once done it looked good and the rest of the construction was straight forward.

Painting was per photos and decal instructions, I used Humbrol Acrylics for the Dark Green (Hu163) and Aluminum (Hu56). The Dark Earth is Vallejo 70.921 which matches perfectly the RAFM chip. The more I use it, the more I like it (color that is, I'm still not happy with adhesion of the paint).

Decals are by Model Alliance. I did not use all the stencils at most are not visible in photos so I chose that are readily visible. They all laid down well using Revell Decal Soft over a coating of Future/Kleer. A final coat of flat to tone it all down finished the model.

Summary

As many should know, I'm not a modern nor jet builder. This was an easy and enjoyable build and I can see why some modelers are fans of the BAE Hawk and this Airfix kit specifically. I'll never say "never" but I doubt I'd build another Hawk. The only other scheme that tempts me is the USN commemorative "yellow wings" scheme. Maybe if this becomes another theme…


Thanks for looking…


Another Anniversary

Mk I, K9797, 19 Squadron, Duxford 1938

This is my second attempt at an introductory Spitfire.  My previous attempt was a squadron-mate from just a few months later in the year, but essentially the same kit.  The relatively new tooling of the Airfix Spitfire Mk I/IIa.

The Subject

19 Squadron was the first Spitfire squadron, forming on the plane in Autumn 1938.  When first established on the Spitfire, the squadron did not carry squadron codes (later WZ was assigned) but instead painted their squadron number on the tail in flight colors.

This subject was built for two reasons: 1) I wanted this scheme on my shelf; and 2) it's the 75th anniversary of the Spitfire's debut in operational service this year.  The latter supports our club theme of "Anniversary" and this kit fit nicely.

The Kit

This is becoming my go-to kit for early Spitfires.  There's not much more I can say about it, it's just a great little kit.  The major differences in this build was the addition of the pilot and use of the "wheels up" option.  To make the pilot fit, unfortunately I had to shorten his legs.

Paints are acrylics throughout, Humbrol 29 for the Dark Earth and Vallejo 70.893 for the Dark Green.  The underside is Tamiya X-11 Chrome Silver (for a variation in the underside Aluminum).  

The decals are from Model Alliance and were included with the On Target Profiles 4 booklet.  

I put it on the Airfix dogfight double stand, to display with my other "anniversary" model, the BAE Hawk T.1A in commemorative markings in 2008.  But that's another subject to blog…


Thanks for looking...


Tuesday, November 19, 2013

Telford 2013

10 November 2013

So one of the things I got to do at Telford this year was sit in a real Spitfire. It's not a flyer, and has a few things that are actually fiberglass, but the fuselage is a real Mk IX with some history behind it.

I joined up with Jim Rotramel who came over to see family and of course do Telford while he's here.


Thanks for looking...


Saturday, October 12, 2013

LF IXe, 5531, Air Operations School, AFS Langebaanweg, SAAF, May 1953


The South African Air Force was a long time user of the Spitfire. Almost from the earliest marks. I seem to have a few SAAF aircraft, Spitfires and Hurricanes, on my shelf and it's probably due to a combination of subject and color. Typically their national markings had the red replaced with orange, and of course later the gazelle was put in the center.

And their camouflage schemes were sometimes non-standard in that they used paints more appropriate to their mission and surroundings.

The Subject


The AOS was generally used in an operational training role, teaching pilots in other types what it be like when bounced by their adversaries. Given the timeframe I admit that I'm putting 2+2 and getting 5 -- I'd like to think these Spitfires were used to mimic Yak 9 fighters the SAAF pilots might have faced over Korea.

So I fancy the idea of Spitfires and Mustangs in 1v1, 2v1, and 2v2 mock engagements over Langebaanweg operating areas; then the Mustangs deploying off to Korea for operations. These LF Mk IXe were used from about 1948-1953. Some online and decal sources call these aircraft Mk XVI because they are rear view aircraft, but in actuality the only aircraft provided to SAAF were LF Mk IXe, both standard and rear view, with pointed/broad chord rudders.

I don't know the original serial number of 5531, but it was one of a batch of 136 provided to the SAAF just after the war.

The Model


This was meant to be a quick build, one of many Heller XVI kits I've got in my stash, picked up for about $2 each at swap tables. The Heller kit is fairly accurate, the only real issues are raised panel lines, sparse decals in the cockpit and wheel bays and the radiator baths are too deep.

The radiator baths are the most obvious fix that must be done. The other details were not an issue for me; I wanted to display this model in flight so the wells would be covered up and the cockpit would have a pilot in it, hiding any detail that might have been added.

The fix for the radiators is really straight forward. Cut them off, then glue them back on. Generally the thickness of most razor saws is enough to compensate for their deepness. It appears the the baths are more accurate for a Griffon Spitfire, and may have been an error introduced when Heller was researching the Belgian Spitfires, who had a mix of XVI and XIV airframes. At any rate, the Heller kit looks wrong if these are left alone, but if corrected it becomes a very attractive model.

I took care to ensure I didn't lose much of the raised detail, and replaced any I'd lost due to seam filling. The pilot and raised landing gear are from an Airfix Mk IXc kit.

The scheme is Extra Dark Sea Grey over Medium Sea Grey. I used Humbrol paints, a mix for the EDSG (to a tin of Hu123, add 1 ml Hu34 + 0.5 ml Hu25) and Hu165 for the MSG. The spinner is Hu25. Acrylics throughout, applied via airbrush.

The decals are from AlleyCat, sheet 72009. They went on quite well using Revell's Decal Soft.

The clear stand is from Airfix.

Summary


Another enjoyable build. Very easy and different on my shelf. The club theme was "Korean War" -- any subject from that conflict. This was a stretch, but I'd already done the FR.47 Seafire.

Thanks for looking...


Spitfires in Space


Okay, how strange can that be? Well, if you follow Dr Who then anything is possible.

It seems that back in the 2010 season there was an episode where the Daleks are watching humans during the Battle of Britain; and in a bit of alternative history, the Battle is raging on into the mid-40's with no US or USSR involvement in the war. In other words, both sides seem to be stuck and it's because of the Daleks, one is led to believe.

At any rate, there is of course some sort of death ray, a robot who doesn't realize he's not human, the Dr in a frenzy to save humanity, but of course to me the star of the show was not the Dr, or the beautiful companion, but the Spitfire that plays a crucial part in, yes, saving Britain once again at her darkest hour.

The Aircraft


A basic Mk IXc, (so it must be 1943 or 1944) modified to 1) operate in the vacuum and zero gravity of space; and 2) fitted with laser cannons because we all know the 20mm Hispanos won't work in space and would be ineffective against the death ray.

Okay, that last bit is true Dr Who, requiring we suspend physics just a bit as well as some common sense. I mean gee whiz, if we can make an aspirated Merlin, unpressurized cockpit, and a FLYING machine work in a vacuum with no gravity, then surely we can make a 20mm cannon work...but then again that wouldn't be as cool would it?

Modifications include a "gravity bubble generator" behind the cockpit (located on frame 12) that not only provides the necessary gravity to offset lack of lift from the wing but also the atmosphere for both the engine and cockpit. Additionally the inboard cannon were removed (but mechanisms retained to allow "normal" use inside the atmosphere) and the outboard bay has the laser cannon. There is a bulge for it, and it's a bit bigger than a standard bulge.

It appears only 3 airframes were modified. Only 1 survived the attack on the Dalek space ship. It was piloted by an unnamed pilot, who's call sign was "Danny Boy". His aircraft was MK392, JE-J. But instead of a Canadian maple leaf under the wind screen there was a large Union Jack with the Wing Commander's pennant just forward on the right side.

Since this either pre-dates the D-Day invasion, or supersedes it, then no identification stripes were on the airframe.

The Model


Hmm, so which kit could I use...oh right! The Airfix Mk IXc kit (A02065) not only has the basic kit, but also the right decals (with exception of the Union Jack).

The mods I made were to remove the cannon bulges and replace with larger Mk Vb cannon bulges over the outboard cannon breech. I then found suitable beads from a craft shop to replicate the laser cannon "barrels" and put stubs on the inner cannons. I then put a piece of clear sprue at frame 12 and painted it to resemble the gravity generator from the show.

The show's Spitfire attack sequence is all very quick, and shifts back and forth between the Dr, Sir Winston Churchill in his bunker and the Spitfires during their attack. I was able to pull some stills from the video, but they are not as clear as I'd like. So I used some artistic license.

I completed the model in a flying mode, since there are no photographs of the modified MK392 on the ground (must have been really top secret you know).

Other than the Union Jack, this model is complete, which is why I'm blogging it. I haven't found the Jack yet but I'm looking, albeit not hard.

I brush painted the entire model. I wanted to see how well I could do with a brush painted base coat (the Sea Grey, Medium) with the Ocean Grey and Dark Green on top of that. I did air brush the Sky band and spinner, because I was painting another Spitfire's undersides at the time...

The yellow leading edge was the most difficult. It actually covered well, but was just a bear to get right. Ultimately I ended up sanding it back down and starting over, but instead of masking just painted the edge freehand.

All paints are Humbrol Acrylics. Sky is Hu90 with 2ml of Hu34 added to the pot and a drop of Hu40. Dark Green is Hu116. Sea Grey Medium is Hu165; Ocean Grey is Hu106. I added a bit of Windsor & Newton flow improver to the mixing tray (not into the pot) as I brushed it on and while it took a few coats it looked right after the 2nd, but looked great after the 3rd coat. Not as smooth as an air brush finish, but then again I didn't use the air brush.

Summary


This was a very fun build. I thoroughly enjoyed it. It took me back to my early days when models were about imagination. Not quite a weekend build, but it did go quickly. The most difficult aspect (apart from the Union Jack decal) is the right bead for the laser cannon barrels.

This was for a theme in our club of "Science Fiction". Any subject that was science fiction; either book, film or television. What's left for the Spitfire?

Thanks for looking...


Saturday, September 28, 2013

RAF Dark Earth: A good hobby paint match?


13 October, 2013

As promised below, I've added a photo comparing the appearance of Vallejo 921 to Humbrol 29.  The Dark Green is both cases is Vallejo 893.  All paint was air brushed.  Both models have a coat of Future/Klear as a varnish to ensure the sheen is the same.


As I mentioned below, Vallejo 921 (on the right) is darker than Humbrol 29, and when brush painted the Vallejo was greener, but not noticeably redder, as is evident in the photo.  It is also redder in real life.

So how does it stack up?  Well, Vallejo 921 matches the paint chip from the RAF Museum.  It looks the part, in my mind's eye, better than does Humbrol 29.  I am however trained to consider Humbrol 29 as the "correct" shade of Dark Earth.

28 September, 2013

A recent thread on BritModeler offered the possibility that my favorite Dark Earth, Humbrol's 29, has drifted away from the correct shade of dark earth. So, armed with all my favorite acrylics and a couple of mixing jars, I decided to do a comparison.

My color standard is a chip from the RAF Museum's book, "British Aviation Colurs of World War Two". First published in 1976 it's possible to get a second hand copy, as I did, from online auctions. It's a treasure if as a modeler you want to have colors that match.

My method of comparison is using my eyeball under both artificial and natural light. I brush the paint onto a sheet of card and simply lay the card on the color chip.

The paints I use/have at hand are:
  • Humbrol 29
  • Vallejo 921
  • PollyScale 505252
  • Model Master 4846
  • Gunze H72
  • Tamiya mix of XF52 and XF64 (equal parts)

Hu29 has been my standard for Dark Earth for over a decade.  Prior to that I used Gunze's H72 for the handful of RAF types on my shelf.  Once I started paying attention to color accuracy, I realized Hu29 would look better, and it WAS different than H72, being darker and richer.

Hu29 is generally accepted as the standard paint, but against the RAF Museum (the Standard), Hu29 is grayer and browner. It's almost a chocolat color when overlaid on the chip. Unlike the Standard, there does not seem to be a hint of green to Hu29.

Valejo 921 is a near perfect match. Next to the other dark earth paints, Valejo 921 looks greener. Which may be why during the war there was some indication that Olive Drab would be an acceptable substitute for Dark Earth.  I've never used Valejo 921 other than with a brush on details requiring some shade of dark brown.

PS 505252 is darker than the standard, just a bit browner albeit with a hint of green.  I've used it for variation, many years ago, on an AVG P-40C.

MM 4846 is labeled ANA 617 Dark Earth. It is identical in every respect to PS 505252 being just a bit browner with a hint of green.  I've never used it, but purchased it when trying to find the "right" Dark Earth around 2002.

H72 is lighter and browner than the Standard, it's not close to any of the other paints. At best I'd call it a light earth color.  I'd been using this jar of paint since the early '90s.

Finally, I used the formula for mixing Tamiya (my preferred paint) that Tamiya recommends. The resulting color is a very red brown, not much different than XF64.  So I don't consider this a very good match to anything other than a red brown.

Since I like Tamiya paints, I did try adding more XF52 (8 parts total), but that was marginally better as the color was still a red brown. I then added 1 part XF19 (Sky Grey) which was also only a marginal improvement. Finally, I decided to add 5.5 parts XF81 (Dark Green) which only got the color to approximately where both PS 505252 and MM 4846 are. I believe some yellow would get it there, but the jar is full and I don't have any Tamiya yellow handy...

Other than a few minor applications I've never used Valejo. I will try it soon on a Spitfire to see how the scheme looks with a proper Dark Earth shade and I'll update this posting with side by side photos of a Spitfire with Humbrol 29.

Thanks for looking...

Thursday, July 4, 2013

Progress, even if just a little bit, is still progress


Well, that sounds cynical when I say it out loud.

My shipment showed up at the end of April and I finally got my kits out, the ones I'd started last year and packed up for the shipment across the pond. Everything arrived in good shape, and other than some key supplies like masking fluid and decal setting solutions, I got up and modeling by mid May.

So why am I just now, in July, providing a real update? Progress has been slow as I enjoy the Lake District and do some walking in the fells, which is competing with my modeling time. Work takes me to another city at least one night a week, but I've devised a way to bring a kit to work on in my hotel room. I'm actually starting to "ramp up" on my production.

The Airfix Mk Va conversion is almost done, just need to finish the canopy and decals.

The Airfix PR XIII conversion is in a similar state, just needing another try at the canopy; the first looked okay until I masked and painted it. I was quite proud of how the vac canopy looked, too. That'll be another day of trimming and sanding...

The AZModel Mk VIII is ready for decals and final assembly of the fiddly bits.

The CMR Speed Spitfire is ready for the blue, now that the silver has cured. Need to start on the vac canopy...

The Three Mk IX's (2 Airfix and 1 AZmodel) are almost ready for paint.

The AZModel cannon armed Mk I is ready for primer.

In the queue are an AZModel Mk Vb, Sword Mk Vc and Seafire IIc, AZModel and Airfix Mk Ia, MPM FR XVIII, Airfix Mk VI conversion, and an Airfix Hawk T.1 in 19 Squadron Spitfire commemorative markings. All of which has at least a cockpit and most have a fuselage together with a wing assembly.

Not as far along as I'd hoped before I left the States, but considering I'm barely 10 weeks since I got my stuff...and six of these kits are new starts since my arrival...I'm happy with the progress.

My cottage has a few shelves, I may be able to display a dozen or so at any given time. I'd planned for that and actually brought some storage boxes for the kits once I'm ready to cycle them out and put new ones on. Some I'll take back to the States for show-n-tell if I'm home during the meetings.

I brought all my Spitfire kits here to complete during my tenure. That's the goal anyway, a guy can dream!

Until next time...